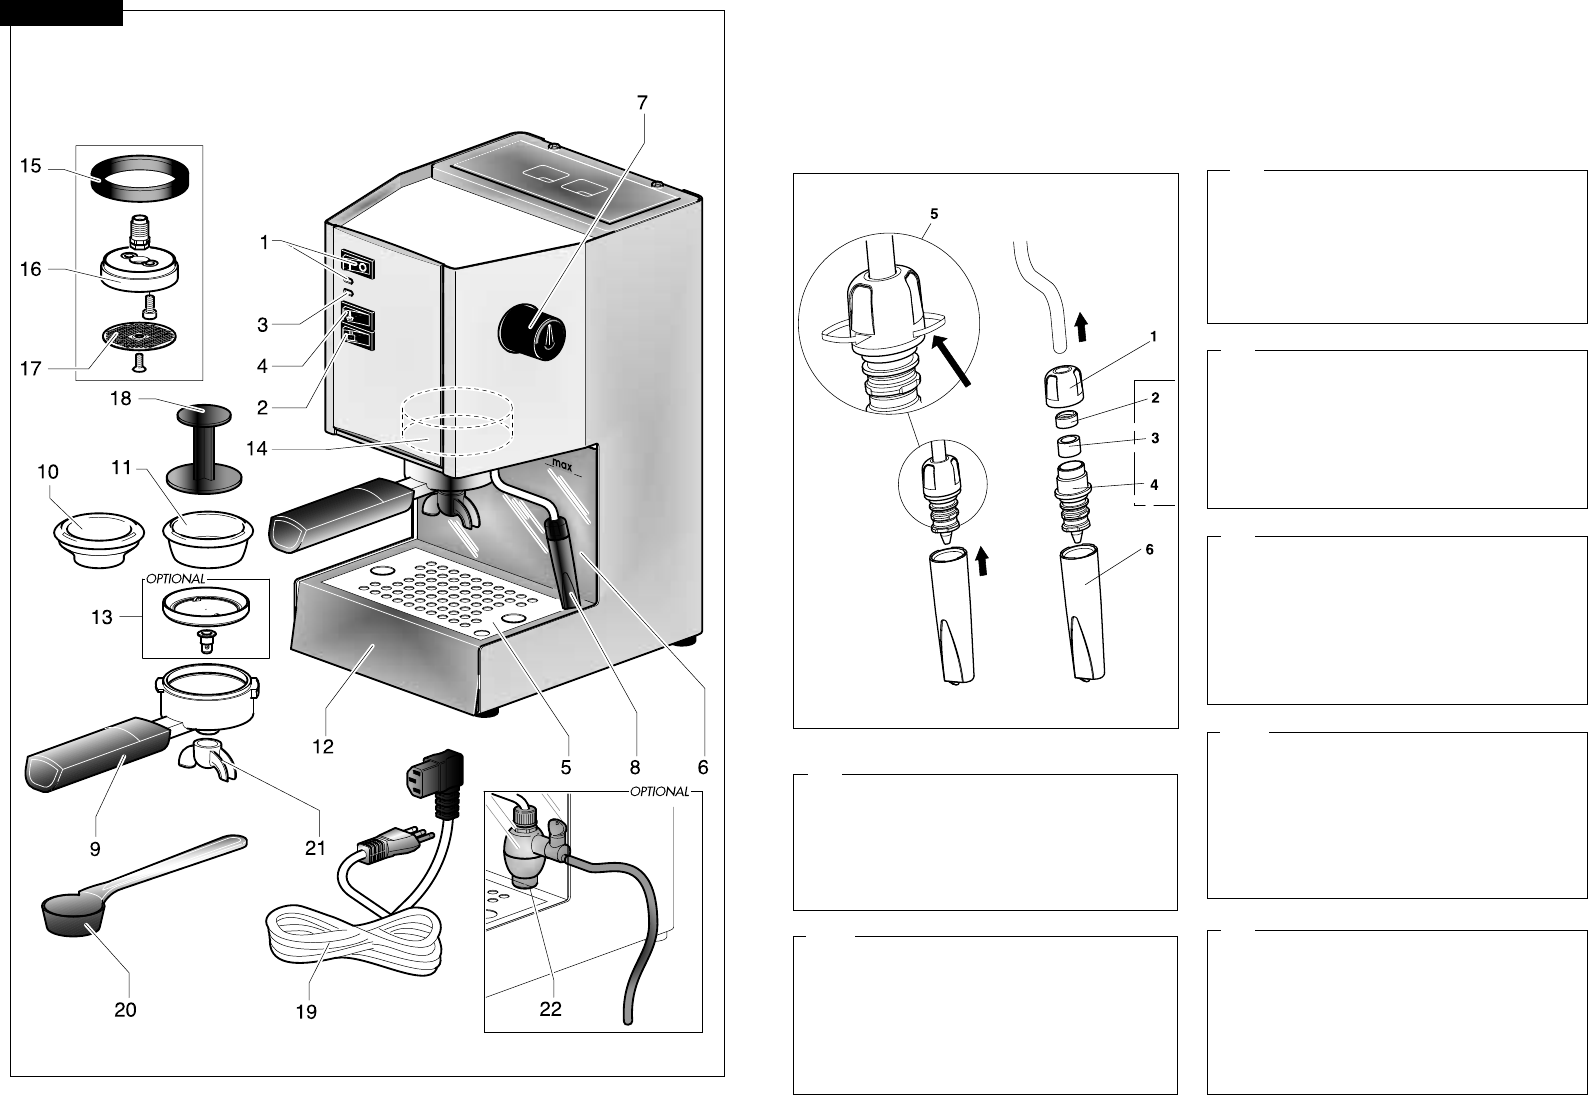
FIG.01
La prima volta che usate il pannarello, dovete ...
The first time you use the frother, you must...
Bei erstmaliger Verwendung des Schaumschlägers müssen Sie .
La première fois que vous utilisez le mixeur, il faut.....
La primera vez que usa el esquema, siga las instrucciones que se detallan a continuación
De eerste keer dat u het stoompijpje voor het opschuimen van melkgebruikt, moet u .....
Quando se usa o bico pela primeira vez, deve-se ...
I
GB
D
F
E
NL
P
- Gewindenutmutter auf Dampfrohr aufsetzen.
- Gummiring 3 in Düse 4 einsetzen, Gumminiederhalter
2 auf Gummiring 3 aufsetzen, Komplex 2-3-4 in
Dampfrohr einführen.
- Gewindenutmutter 1 auf Düse 4 schrauben.
Festschrauben 5.
- Untere Außenbüchse 6 gemäß Abbildung einfügen.
- Festschrauben
- Glisser la douille filetée 1 sur le tuyau de la vapeur.
- Insérer le caoutchouc 3 dans linjecteur 4, insérer le presse-
caoutchouc 2 sur le caoutchouc 3, emmancher lensemble
2-3-4 sur le tuyau de la vapeur.
- Visser la douille 1 sur linjecteur 4. Serrer 5.
- Insérer le manchon externe inférieur 6 comme il est
indiqué sur la figure.
- Serrer
- Introduzca el casquillo roscado 1 en el tubo de vapor.
- Introduzca la empaquetadura de anillo 3 en el inyector
4, introduzca el aprieta-empaquetadura 2 en la
empaquetadura 3. Acto seguido, ubique el grupo 2-
3-4 en el tubo de vapor.
- Enrosque el casquillo roscado 1 en el inyector 4.
Enroscar hasta el tope 5.
- Introduzca el forro exterior 6 como se aprecia en la figura.
- Enroscar hasta el tope
- Schuif de getapte sluitring op het stoompijpje.
- Schuif het rubbertje 3 in het spuitstuk 4, schuif de
rubberhouder 2 op het rubbertje 3, zet het geheel
2-3-4 op het stoompijpje.
- Draai het einddopje 1 op het spuitstuk 4.
- Bevestig het mondstuk onderaan op het spuitstuk,
volgens de afbeelding.
- Vastdraaien
- Enfie o casquilho roscado no tubo de vapor.
- Introduza a borracha 3 no injector 4. Introduza o
pressionador da borracha 2 por cima da borracha
3; a seguir introduza o grupo 2-3-4 no tubo de vapor.
- Enrosque o casquilho roscado 1 no injector 4.
- Introduza o canote externo inferior como ilustrado
na figura.
- Apertar
- Infilare la Ghiera filettata 1 sul tubo vapore.
- Inserire il gommino 3 nellIniettore 4, inserire il Pre-
mi-gommino 2 sopra al Gommino 3, calzare lassie-
me 2-3-4 sul tubo vapore.
- Avvitare la Ghiera 1 sullIniettore 4. Serrare 5.
- Inserire il canotto esterno inferiore 6 come in figura.
- Serrare
- Slide the Ring Nut 1 onto the steam hose.
- Place the Gasket 3 into the Injector 4, and place the
Gasket Press 2 over the Gasket 3. Slide the assembly
2-3-4 over the steam hose.
- Screw the Ring Nut 1 onto the Injector 4. Tighten 5.
- Attach the lower external housing 6 as shown in the
Figure.
- Tighten


