


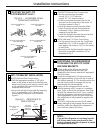

Care and cleaning of the refrigerator.
Cleaning the Outside
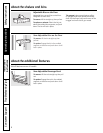
The door handles and trim. Clean with a
cloth dampened with soapy water. Dry with
a soft cloth. Do not use wax on the door
handles and trim.
Keep the outside clean. Wipe with a clean
cloth lightly dampened with kitchen
appliance wax or mild liquid dish detergent.
Dry and polish with a clean, soft cloth.
Do not wipe the refrigerator with a soiled
dish cloth or wet towel. These may leave a
residue that can erode the paint. Do not
use scouring pads, powdered cleaners,
bleach or cleaners containing bleach
because these products can scratch and
weaken the paint finish.
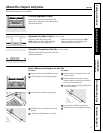
The stainless steel panels and door
handles. Stainless steel (on some models)
can be cleaned with a commercially
available stainless steel cleaner. A spray-on
stainless steel cleaner works best.
Do not use appliance wax or polish on the
stainless steel.
Silver-plated plastic parts. Wash parts with
soap or other mild detergents. Wipe clean
with a sponge, damp cloth or paper towel.
Do not scrub with steel-wool pads or other
abrasive cleaners.
Cleaning the Inside
To help prevent odors, leave an open box of
baking soda in the refrigerator and freezer
compartments.
Unplug the refrigerator before cleaning. If
this is not practical, wring excess moisture
out of sponge or cloth when cleaning around
switches, lights or controls.
Use an appliance wax polish on the inside
surface between the doors.
Use warm water and baking soda solution—
about a tablespoon (15 ml) of baking soda to
a quart (1 liter) of water. This both cleans and
neutralizes odors. Rinse and wipe dry.
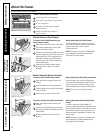
After cleaning the door gaskets, apply a thin
layer of petroleum jelly to the door gaskets at
the hinge side. This helps keep the gaskets
from sticking and bending out of shape.
Avoid cleaning cold glass shelves with hot
water because the extreme temperature
difference may cause them to break. Handle
glass shelves carefully. Bumping tempered
glass can cause it to shatter.
Do not wash any plastic refrigerator parts
in the dishwasher.
Silver-accented plastic parts. Wash parts
with soapy water. Wipe clean with a sponge,
damp cloth or paper towel.
Do not scrub with steel-wool pads or other
abrasive cleaners.
12
Consumer Support Troubleshooting Tips
Operating Instructions
Safety Instructions
Installation
Instructions
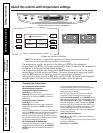
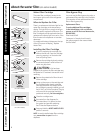
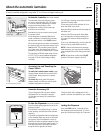
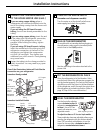
About the automatic icemaker.
Precise Fill (on some models)
This water dispenser is equipped with a feature
called Precise Fill. This feature allows you to
choose a precise amount of water. Units include
ounces, cups, pints or liters.
Models with External Dispensers
Access By: Home > Precise Fill > Set Amount
Activate By: Using the arrow buttons to select the
desired amount. Press MORE UNITS to select
between CUPS, OUNCES, PINTS or LITERS.
Press the cup against the cradle and water
will begin dispensing. It will automatically
stop when the amount set has been
dispensed. The display will show there
is no water left to dispense, then reset.
NOTE: Do not leave the dispenser unattended
when water is being dispensed.
If you would like to stop dispensing water
before the specified amount has been
dispensed, just remove the cup from the
cradle. The display will show the amount left
to dispense.