


14
About changing the power level.
The power level may be entered or
changed immediately after entering the
time for Time Cook, Time Defrost or Express
Cook. The power level may also be changed
during time countdown.
First, follow directions for Time Cook,
Time Defrost or Express Cook.
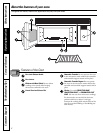
Press the POWER button.
Turn the dial clockwise to increase and
counterclockwise to decrease the power
level. Press the dial to enter.
Press the START/PAUSE button to start
cooking.
Variable power levels add flexibility to
microwave cooking. The power levels on
the microwave oven can be compared to
the surface units on a range. Each power
level gives you microwave energy a certain
percent of the time. Power level 7 is
microwave energy 70% of the time. Power
level 3 is energy 30% of the time. Most
cooking will be done on High (power level
10) which gives you 100% power. Power level
10 will cook faster but food may need more
frequent stirring, rotating or turning over.
A lower setting will cook more evenly and
need less stirring or rotating of the food.
Some foods may have better flavor, texture
or appearance if one of the lower settings is
used. Use a lower power level when cooking
foods that have a tendency to boil over,
such as scalloped potatoes.
Rest periods (when the microwave
energy cycles off) give time for the food
to “equalize” or transfer heat to the inside
of the food. An example of this is shown
with power level 3—the defrost cycle. If
microwave energy did not cycle off, the
outside of the food would cook before
the inside was defrosted.
Here are some examples of uses for various
power levels:
High 10: Fish, bacon, vegetables, heating
liquids.
Med-High 7: Gentle cooking of meat and
poultry; baking casseroles and reheating.
Medium 5: Slow cooking and tenderizing
for stews and less tender cuts of meat.
Low 2 or 3: Defrosting; simmering; delicate
sauces.
Warm 1: Keeping food warm; softening
butter.
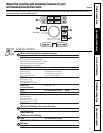
4
3
2
1
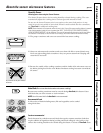
Arcing Arcing is the microwave term for sparks in the oven. Arcing is caused by:
■ the metal shelf being installed incorrectly and touching the microwave walls.
■ metal or foil touching the side of the oven.
■ foil that is not molded to food (upturned edges act like antennas).
■ metal such as twist-ties, poultry pins, gold-rimmed dishes.
■ recycled paper towels containing small metal pieces.
■ the turntable ring support being installed incorrectly.
Covering Covers hold in moisture, allow for more even heating and reduce cooking time. Venting plastic wrap or
covering with wax paper allows excess steam to escape.
Shielding In a regular oven, you shield chicken breasts or baked foods to prevent over-browning. When microwaving,
you use small strips of foil to shield thin parts, such as the tips of wings and legs on poultry, which would
cook before larger parts.
Standing Time When you cook with regular ovens, foods such as roasts or cakes are allowed to stand to finish cooking or
to set. Standing time is especially important in microwave cooking. Note that a microwaved cake is not
placed on a cooling rack.
Venting After covering a dish with plastic wrap, you vent the plastic wrap by turning back one corner so excess
steam can escape.
Microwave terms.
Term Definition
Consumer Support
Troubleshooting Tips
Care and Cleaning
Operating Instructions Safety Instructions