


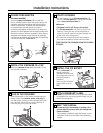

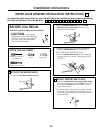
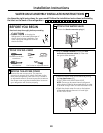
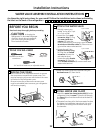

PLUG IN THE ICEMAKER
Place the icemaker on its
side as shown. Insert the
icemaker power cord plug
(A) into the socket on the
side wall, making sure the
prongs and holes are
matched. Press the plug
firmly into the socket.
8
Installation Instructions
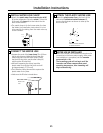
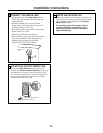
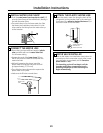
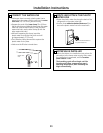
MOUNT THE ICEMAKER
• Lift the icemaker so the fill tube extension (10) fits
in the fill cup opening (C). Hang the icemaker on
the two mounting screws (A).
Make sure:
• The power cord is still firmly in the socket.
• The fill tube extension (10) is still in the fill cup
opening. (Check the rear of the refrigerator to
make sure the fill tube has not been pushed out
of the back of the refrigerator.)
• The icemaker mounting screws are located in
the uppermost position of the mounting slots.
• Make sure the icemaker power switch is set
to OFF.
THEN TIGHTEN THE ICEMAKER MOUNTING
SCREWS SECURELY.
9
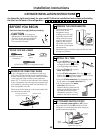
INSTALL THE ICEMAKER FILL CUP
Install the icemaker fill cup (side-mounted) (17) into
the icemaker as shown.
5
ATTACH WARRANTY LABEL
A label (9) is provided with this kit to record the date
of installation for warranty purposes. Apply it to the
back of the refrigerator.
11
KEEP THIS MANUAL
The warranty for the icemaker is printed in this
manual. Keep this manual with your Refrigerator
Owner’s Manual.
The icemaker installation inside the freezer is now
complete. Continue to the Water Valve Assembly
section.
12
10
C
A
A
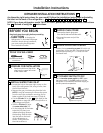
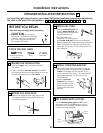
REMOVE PLUG COVER
Remove the electric plug cover
from the side wall of the freezer
compartment. Insert a standard
screwdriver blade into the slot in
the cover and twist the screwdriver,
opening the slot. The cover will pop
off. Discard this cover.
6
INSTALL THE ICE BUCKET
Place the ice bucket that came with your refrigerator
in the lowest position on the left side of the freezer
compartment.
10
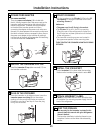
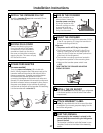
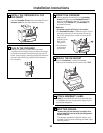
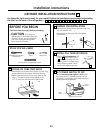
POWER CORD ADAPTER
(on some models)
There is a power cord adapter (18) included with
the kit. Visually inspect to see if the power cord on the
icemaker matches the socket on the side wall of the
freezer compartment. If needed, secure the adapter
to the side of the icemaker power cord. When
connecting the adapter to the power cord, make sure
the seal is in place between the connectors, and ensure
that both connector locks are snapped in place. Secure
the power cord adapter to the icemaker by putting it
into the hook at the back of the icemaker and attaching
it to the icemaker with a wire tie (20).
7
Hook
Seal
Locks
27
17