


Duet
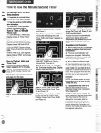
The oven is vented through a duct
A?a&k /
that’s located orI the right side of
—
@waseen fi!hrcmghgkiss control
panelafterknobis removed.)
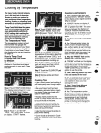
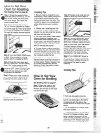
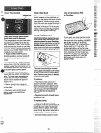
The temperature on your new oven
has been accurately set at the fac-
tory. However, if your food consist-
ently browns too much or too little,
you may make a simple adjustment
behind your OVEN TEMP Knob. To
readjust your thermostat:
@Rotate OVEN TEfViPKnob to
CLEAN position and pull knob off
the shaft revealing area behind
knob.
@Insert the tip of a 3/16” standard
screwdriver, into the indented area
directly under the notch and turn in
the desired direction. Be careful not
to scratch glass control panei.
To increase oven temperature
move diai one notch counterclock-
wise. To iower oven temperature,
move diai one notch ciockwise.
(Each notch represents approxi-
mately 150.)
ISReturn knob to the range by
matching the fiat area of the knob
to the shaft.
@Recheck oven performance
before making an additional
adjustment.
the oven just above th~ door handie
(seepage 6). Moisture and vapors
from the oven are vented through it
when oven is in use. Nevercover
the hoie in the duct. To do so pre-
vents it from functioning properiy
during cooking and cieaning.
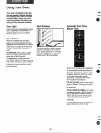
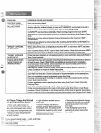
LampFM@acmyixit
C3WiiK)hk Before replacing your
oven iiarnpbulb, disconned the
electric powerfor your Cooking
Center at h main fuse or circuit
Meaker pand. Be sure to iet the
iamp coverand buib cooi completely
before removing or repiacing them.
The oven iamp (buib) is covered
with a giass removabiecoverwhich
is heid in piace with a baii-shaped
wire. Removeoveri door, if desired,
to reach cover easiiy.
Toremove:
~ i-ioid hand undercover so it
doesn’t faii when reieased. With
fingers of same hand, firmiy push
back wire baii untii it ciears cover.
Lift off cover.DO NOT REMOVE
ANY SCREWS TO REMOVE
COVER
~ F?epiacebuib with 40-watt home
appiiance buib.
To replace cover:
@Piace it into groove of iamp
receptacle. Puii wire baii forward to
center of cover untii it snaps into
piace. When in piac~, wire hoids
cover firmiy. Becertain wire baii is
in depression in center of cover.
@Connect e!ectric power to oven.
—
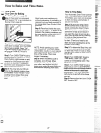
if you wish, you may iine the broiier
pan with aiuminum foii and cover
the rack with it for broiiing. ALWAYS
BE SURE TO MOLD THE FOiL
THOROUGHLY TO THE BROiLER
RACK AND SLiT THE FOiL TO
CONFORM WiTH SLiTS iN THE
RACK. Stopping fat and meat juices
from draining into the broiier pan
prevents the rack from serving its
purpose and MAY LET JUiCES
BECOME HOT ENOUGH TO
CATCH FiRE.
—.
—
—
~—
—- -
——
—
—.
—
—
—
—
—
——-–—
—r.
—
—.
—–
—–
—
—
—
E
—-
—
—
iE%%%”-
—
—
—–
—
—
E
—
——