


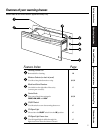


Installation of the warming drawer.
Read these instructions completely and carefully.
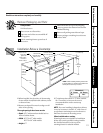
Installation Below Wall Ovens
■ When installed, the front face of the warming
drawer will be nearly flush with cabinetry doors
or drawer fronts.
■ Drawer overlaps will conceal cut edges on all
sides of the opening.
The rough opening for the drawer must be:
—Depth:
23
1
⁄2″ minimum from inside back to
front of cabinet frame.
—Width:
25
1
⁄2″ for 27″ wide models
28
1
⁄2″ for 30″ wide models.
—Height:
9
1
⁄4″
—
Allow 2″ minimum between oven and drawer
cutouts for clearance of overlaps.
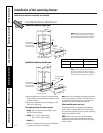
NOTE:
If you are installing in frameless cabinets,
it may be necessary to install 1/2″ wide cleats to
accept drawer mounting screws. See drawer to
find exact locations of mounting screws.
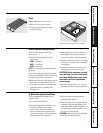
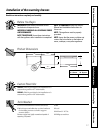
When installed under a wall oven:
Warming drawers are suitable for installation
below only certain specified wall oven models.
See the label attached to the top of the warming
drawer for suitable models.
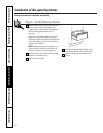
NOTE:
Electrical receptacle can be installed
as shown for countertop installations. Do not
install receptacle above the top of the warming
drawer cutout.
23
1
⁄2″
Min.
2x2 or 2x4 anti-tip
block against rear
wall 9” from floor
to bottom of block
1″ Min. above toekick or adjust
to oven installation height
A
B
Oven
cutout
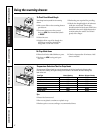
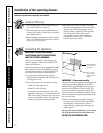
NOTE:
Additional clearance between cutouts may
be required. Check to be sure that oven supports
above the warming drawer location do not obstruct
the required interior 23
1
⁄2″ depth and 9
1
⁄4″ height.
Installation below a single oven
2″ Min
1″ Min. above toekick
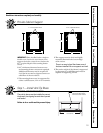
NOTE:
Additional clearance between cutouts may
be required. Check to be sure that oven supports
above the warming drawer location do not obstruct
the required interior 23
1
⁄2″ depth and 9
1
⁄4″ height.
Installation below a double oven
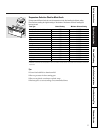
Dimension A Dimension B
27
″
Drawer 25
1
⁄
2
″
26
3
⁄
4
″
30
″
Drawer 28
1
⁄
2
″
30
″
2x2 or 2x4 anti-tip
block against rear
wall 9” from floor
to bottom of block
9″
2″
Min.
Allow 5/8”
overlap on
all sides
10
1
⁄2″
23
1
⁄2″
Min.
Allow 5/8″ overlap
on all sides
A
Oven
cutout
23
1
⁄4″
10
1
⁄2″
B
9″
9
1
⁄4″
23
1
⁄4″
9
1
⁄4″
Customer Service Troubleshooting Tips Installation Instructions Care and Cleaning Operating Instructions Safety Instructions
14