


PREHEATING THE GRILL
1. Close the lid on the grill.
2. Unwind the cord and plug it into a standard electrical outlet.
3. Both lights on top of the grill will be illuminated.
4. Allow the grill to preheat for at least 5 minutes before grilling. If desired,
use a kitchen timer.
5. The green light will go off when the grill has reached the preset
temperature.
GRILLING
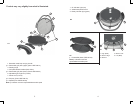
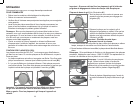
Important:Theoatinghingepositionallowsforgrillingextrathick
foods. In this position the grilling plate rests on top of the food.
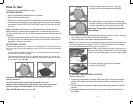
1. Using a pot holder, carefully open the preheated grill.
2. Beforerstuse,ifdesired,lightlyoilthecookingplates.
Note: Aerosol cooking spray should not be used on the nonstick surface.
The chemicals that allow the spray to come out of the can build up on the
surfaceofthegrillplatesandreducetheirefciency.
3. Carefully place the foods to be cooked on the bottom grilling plate of
the preheated grill. This grill usually accommodates 2 to 4 servings.
Note: Do not overload the cooking plate.
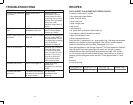
4. Closethelidintheoatinghingeposition(G)
with the lid closing directly onto the food.
5. Allow the food to cook for the desired time (use
of a kitchen timer, if desired). The GRILLING
CHART on pages 8-10 may be helpful in
determining proper cooking times.
Important: Do not leave the appliance unattended during use.
6. Light pressure to the handle can be used to press and heat the food to your
liking.
Caution: Do not use heavy pressure on the lid of the grill at any
time.
7. This feature is especially handy when preparing grilled sandwiches and
grilling thick pieces of meat and poultry.
8. After cooking for the suggested time the food should be done. If you
would prefer longer cooking, simply follow the steps beginning at step
4.
9. Using a pot holder, carefully open the lid.
10. Remove the cooked food using the plastic spatula provided or a nylon
heat resistant spatula.
Note: Always use silicone, heatproof plastic or wood utensils to avoid
scratching the nonstick surface of the grill plates. Never use metal spatulas,
skewers, tongs, forks or knives.
11. Unplug the grill to turn the appliance off.
8
7
G
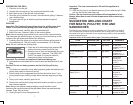
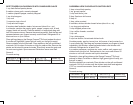
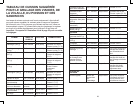
SUGGESTED GRILLING CHART
FOR MEATS, POULTRY, FISH AND
SANDWICHES
Thefollowingaremeanttobeusedasaguidelineonly.Timesreectafullgrillof
food. Cooking time will depend upon thickness and cut being used. Use cooking
thermometer as test for doneness. If food needs longer cooking, check periodically
to avoid overcooking food.
Important: Refer to illustration A4 on page 4 for setting indications.
Important: The heat continues to be ON until the appliance is
unplugged.
12. Allow the drip tray to cool before removing it from under the grill. Wash
and dry the drip tray after each use.
Caution: Do not remove the grill plates while the appliance is hot.
Always allow them to cool to room temperature before removing or
cleaning.
FOOD COOKING TIME SETTING COMMENTS
MEAT
Hamburger (5 oz.) 4 - 6 minutes
High (Max)
¾-inch thick
cooked to medium
(160ºF)
Frozen Hamburgers
(5 oz.)
5 to 6 minutes
High (Max) ¾-inch thick
Cooked to
medium (160ºF)
Flank steak (½ lb.) 7 to 9 minutes High (Max) 1-inch thick
Cooked to
medium rare
(145ºF)
Skirt steak (½ lb.) 5 to 7 minutes High (Max) 1-inch thick
Cooked to
medium (160ºF)
NY Strip Steak (Shell
Steak) (6 oz.)
5 to 7 minutes High (Max) ¾-inch thick
cooked to
medium rare
(145ºF)
Beef Tenderloin (5 oz.) 4 - 6 minutes High (Max) ¾-inch thick
Cooked to
medium rare
(145ºF)
Beef Kabobs 5 to 7 minutes High (Max) Cooked to
medium (160ºF)
Pork loin chops,
boneless
6 to 8 minutes Medium High ¾-inch thick
cooked to 160ºF