


10
Canopy Hood
®
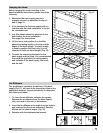
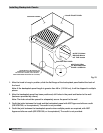
• ThesefastenersaretohelpmaintainthelocationoftheBackSupply,andarenotintendedto
hold the weight of the Back Supply Unit.
• Thefastenersshouldnotinterferewiththeremovableairdiffusers.
• The31.25in.(79.375cm)heightisbaseduponthecanopyhoodhangingheightof78in.
(198.12 cm) from the finished floor to the bottom of the hood.
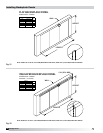
L (MODULE LENGTH)
L/2
L/2
L/2
L (MODULE LENGTH)
L/4
L/4
STEP 1
CENTERED ON WIDTH OF THE SUPPLY,
CUT (2) 4 in. X 24 in. OPENINGS AT
THE SUGGESTED LOCATIONS ABOVE
(IF MODULE > 6 ft.)
THE SUGGESTED LOCATION ABOVE
CUT (1) 4 in. X 24 in. OPENING AT
CENTERED ON WIDTH OF THE SUPPLY,
(IF MODULE < 6 ft.)
STEP 1
4 in. TO 6 in.
FASTEN WITH SCREWS, OR TACK WELDS EVERY
PLACE THE DUCT COLLAR OVER THE OPENING,
STEP 2
Fig. 13
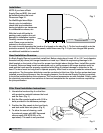
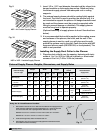
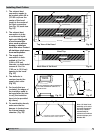
• The4in.(10.16cm)
high duct collar is to
be attached to the
back supply.
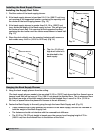
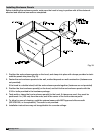
5. Hang the back supply plenum from the ceiling.
(The back supply plenum needs to be mounted 31.25 in. (79.375 cm) above the floor (based upon a
canopy hood that will be hung at 78 in. (198.12 cm) above the finished floor. This is measured from
the lowest rear edge of the back supply plenum to the finished floor. Leave 6 to 10 in. (15.24 to
25.4 cm) of space below the plenum for access to the air diffusers.)
6. Fasten the Back Supply to the wall, going through the lower Back Supply wall. (Fig. 15)
L (MODULE LENGTH)
L/2
L/2
L/2
L (MODULE LENGTH)
L/4
L/4
STEP 1
CENTERED ON WIDTH OF THE SUPPLY,
CUT (2) 4 in. X 24 in. OPENINGS AT
THE SUGGESTED LOCATIONS ABOVE
(IF MODULE > 6 ft.)
THE SUGGESTED LOCATION ABOVE
CUT (1) 4 in. X 24 in. OPENING AT
CENTERED ON WIDTH OF THE SUPPLY,
(IF MODULE < 6 ft.)
STEP 1
4 in. TO 6 in.
FASTEN WITH SCREWS, OR TACK WELDS EVERY
PLACE THE DUCT COLLAR OVER THE OPENING,
STEP 2
Fig. 12
Fig. 14
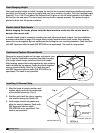
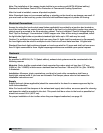
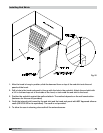
Installing the Back Supply Plenum
Hanging the Back Supply Plenum
Installing the Supply Duct Collar
1. Find the center of the back supply plenum.
2. If the back supply plenum is less than 9 ft. 10 in. (299.72 cm) long,
cut opening at the suggested location, centering the opening over
the center of the back supply plenum. (Fig. 12)
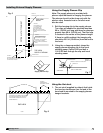
3. If the back supply plenum is greater than 9 ft. 10 in. (299.72 cm)
long, divide the length of the back supply by four. This will give you
the center of each half. Cut openings at the suggested location,
centering the duct collar over the center measurement of each half.
(Fig. 13)
4. Place the duct collar(s) over the opening, fastening with screws or
tack-welds every 4 to 6 in. (10.16 to 15.24 cm). (Fig. 14)
L (MODULE LENGTH)
L/2
L/2
L/2
L (MODULE LENGTH)
L/4
L/4
STEP 1
CENTERED ON WIDTH OF THE SUPPLY,
CUT (2) 4 in. X 24 in. OPENINGS AT
THE SUGGESTED LOCATIONS ABOVE
(IF MODULE > 6 ft.)
THE SUGGESTED LOCATION ABOVE
CUT (1) 4 in. X 24 in. OPENING AT
CENTERED ON WIDTH OF THE SUPPLY,
(IF MODULE < 6 ft.)
STEP 1
4 in. TO 6 in.
FASTEN WITH SCREWS, OR TACK WELDS EVERY
PLACE THE DUCT COLLAR OVER THE OPENING,
STEP 2