


9
Canopy Hood
®
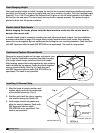
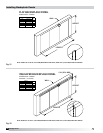
ATTACHED AIR CURTAIN CANOPY STYLE HOOD ATTACHED AIR CURTAIN CANOPY STYLE HOOD
BACKSUPPLY BACKSHELF HOODBACKSUPPLY CANOPY STYLE HOODBACKSUPPLY CANOPY STYLE HOOD
VARIABLE SUPPLY PLENUM CANOPY STYLE HOOD
ATTACHED AIR CURTAIN CANOPY STYLE HOOD ATTACHED AIR CURTAIN CANOPY STYLE HOOD
BACKSUPPLY BACKSHELF HOODBACKSUPPLY CANOPY STYLE HOODBACKSUPPLY CANOPY STYLE HOOD
VARIABLE SUPPLY PLENUM CANOPY STYLE HOOD
ASP - Air Curtain Supply Plenum
HSP or VSP - Variable Supply
Plenum
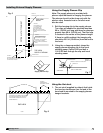
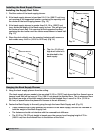
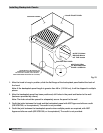
1. Insert 1/2 in. (12.7 mm) diameter threaded rod (by others) into
hanger brackets on the supply plenum top. Raise and hang
the external supply plenum from adequate roof or ceiling
supports.
2. The external supply plenum should be resting lightly against
the hood. The hood is used to position the plenum only, it is
not intended to support the plenum. All hanger brackets must
be used and the plenum must be properly supported while
lifting to prevent damage or distortion. The supply plenum
must be hung level to operate properly.
(Optional fastening of supply plenum to hood. See directions
below).
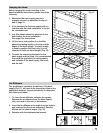
3. It is recommended that caulk be applied at the mating seams
and surfaces of the plenum, the hood, and the wall. If the
supply plenum is next to a wall, you will also need to caulk
around the surface next to the wall. Caulk the joints with NSF
Approved silicone caulk (GE SCS1009, or its equivalent). The
caulk is not provided.
Installing the Supply Duct Collar to the Plenum
1. Place the duct collar(s) over the opening, fastening with tack-
welds at 1 to 2 in. (2.54 to 5.08 cm) intervals, or sheet metal
screws at 3 to 6 in. (7.62 to 15.24 cm) intervals.
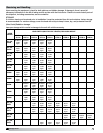
External Supply Plenum Weights, Dimensions, and Supply Rates
Fig. 10
Fig. 9
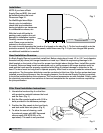
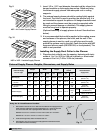
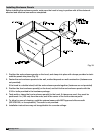
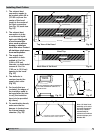
Using the UL Listed Fastener Provided
1. Drill a 9/32 in. hole for the 1/4 in. bolt from the inside of the supply plenum to
inside the hood. Fasteners are to be located max. 6 in. (15.24 cm) from the
end of the hood with max. spacing between bolts 36 in. (91.44 cm)
DO NOT
iNcluDe uTiliTy cabiNeTs Or fillers wh e N figuriNg bOl T placemeNT.
DO NOT bOl T The supply pleN um TO a fire/uTiliTy cabiNeT.
2. Push bolt through hole, attach the washer and nut.
3. Hand tighten, then use a wrench until fully tightened. Caulk around bolts
from inside of hood as necessary.
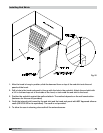
HOLE SIZE 9/32 in.
Installation instructions for the AC3 fastener:
1) Create a 9/32 in. hole for ºî bolt.
2) Install bolt through hole.
3) Install appropriate washer (1/4 in.)
4) Install nut
7) Hand tighten, then use a wrench until tightened.
HOOD
1/4 - 20 UNC - 2A
SS BOLT
1/4 IN. SS NUT
SS FLAT WASHER
Fig. 11
External Supply
Plenum Type
Weight Width Height
Length per
section
Recommended
Supply Rate
(lbs/ft) (kg/ft) (in) (mm) (in) (mm) (ft) (m)
Back Supply
35.0 15.878 6 152.4 Variable Variable 3 to 16
.91 to
4.88
145 cfm/ft
(246.36 m
3
/hr)
Air Curtain Supply
•14inch
9.5 4.31 14 355.6 10 254 3 to 16
.91 to
4.88
110 cfm/ft
(186.89 m
3
/hr)
Air Curtain Supply
•24inch
12.5 5.67 24 609.6 10 254 3 to 16
.91 to
4.88
145 cfm/ft
(246.36 m
3
/hr)
Variable Supply
16.0 7.26 12 304.8 18 457.20 3 to 16
.91 to
4.88
curtain
0-80 cfm/ft
(0-135.92 m
3
/hr)
face
80-160 cfm/ft
(135.92 -271.84 m
3
/hr)
Horizontal Supply
14.0 6.35 12 304.8 18 457.20 3 to 16
.91 to
4.88
150 cfm/ft
(254.85 m
3
/hr)