


17
1. Cleaning Solution
IMPORTANT
For safety and maximum effectiveness, use the solution immediately after
dilution.
Dilute 6.0 . oz. (177 ml or 1 tbs) of recommended cleaner, Hoshizaki "Scale Away" or
"LIME-A-WAY" (Economics Laboratory, Inc.), with 1.0 gal. (3.8 l) of warm water. This is a
minimum amount. Make more solution if necessary.
2. Cleaning Procedure
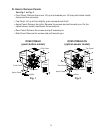
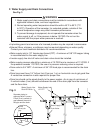
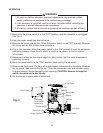
1) Close the water supply line shut-off valve. See Fig. 3.
) Dispense all of the ice from the storage bin.
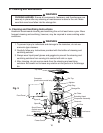
3) Move the power switch to the "OFF" position, then remove the louver and air lter. See
Fig. 5. Move the control switch to the "DRAIN" position, then move the power switch to
the "ON" position. Allow the water system to drain completely (you will see the water
draining into the drain pan).
Note: To ensure that the drain valve opens immediately, you must move the power
switch to the "OFF" position before moving the control switch to the "DRAIN"
position. Otherwise, you may have to wait .5 minutes for the components to
cycle down before the drain valve opens.
4) Move the power switch to the "OFF" position, then unplug the icemaker. Remove the
front panel. On the push-button model, disconnect the connector. Remove the top
panel.
5) Remove the bin top. Remove the agitator and drip ring.
6) Pour the cleaning solution over the extruding head until the evaporator assembly and
the reservoir are full and the solution starts to overow into the drain pan. Allow the
icemaker to soak for about 10 minutes before operation.
Note: If there is excessive scale on the extruding head, ll the evaporator assembly and
reservoir as described above, then use a clamp on the reservoir hose between
the reservoir and evaporator assembly to block ow. Pour additional cleaning
uid over the extruding head until the evaporator assembly is completely full.
7) Remove the grille. Remove spout B, then remove spout A. On the optical-sensor
model, also remove spout B for the water dispenser.
8) Scrub the inside of the storage bin, inside of the bin top, the agitator, drip ring, ice chute
area, spout A, spout B, grille, and the inside of the drain pan using a nylon scouring
pad, brushes, and cleaning solution. Rinse all parts thoroughly with clean water.
CAUTION: Be sure to keep the switch mounted on the bin top dry.
9) Make sure you have allowed the icemaker to soak for about 10 minutes. If you placed a
clamp on the reservoir hose in step 6, remove it.
10) Move the control switch to the "ICE" position. Replace the air lter, louver, drip ring,
agitator, bin top, and panels in their correct positions.
11) Plug the icemaker back in. Move the power switch to the "ON" position. Make ice using
the solution until the icemaker stops making ice.