


10
• In areas where water damage is a concern, install in a contained area with a fl oor drain.
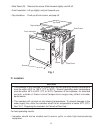
• Allow at least 6” (15 cm) clearance at the right side for proper air circulation and at least
12” (30 cm) clearance at top for ease of maintenance and/or service should they be
required.
• Location should provide a fi rm and level foundation for the equipment.
D. Setup
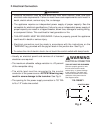
WARNING
The installer must ensure the dispenser unit/ice storage bin is compatible with the
icemaker, and the dispenser unit/ice storage bin and icemaker are properly attached
and secured.
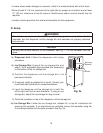
NOTICE
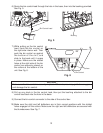
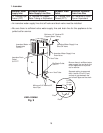
Do not use the side frame to lift the icemaker. See Fig. 1. Lift the icemaker from the
base.
1a) Dispenser Unit: Follow the dispenser unit’s setup
procedure.
1b) Ice Storage Bin: Unpack the ice storage bin and
attach the 4 adjustable legs provided (bin accessory)
to the bottom of the ice storage bin.
2) Position the dispenser unit/ice storage bin in its
permanent location.
3) If required, install an adapter kit or top kit. Contact your
local Hoshizaki distributor for recommendations.
4) Level the dispenser unit/ice storage bin in both the
left-to-right and front-to-rear directions. If using an ice
storage bin, adjust the ice storage bin legs to level.
5) Place the icemaker on top of the dispenser unit/ice storage bin.
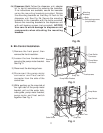
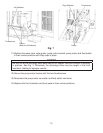
6a) Ice Storage Bin: Follow the ice storage bin, adapter kit, or top kit instructions for
securing the icemaker. If no instructions are available, secure the icemaker using the
2 mounting brackets and the bolts provided. See Fig. 2a.
Fig. 2a
Bin
Bolts
Mounting
Brackets
Icemaker