


Millennium II 6000 Installation Manual
Publication Number: 620919546INS - 4 - © 2003-2004, IMI Cornelius Inc.
Functions of the LEDs are:
• Red and Green OFF = no power to the dispenser
• Green ON = line voltage is within acceptable range
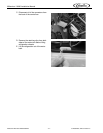
11. Connecting the Drain
A. Remove the drip tray from the dispenser and drill out the stem with a 7/16” (11 mm) drill bit.
B. Route one end of the 5/8” (15.8 mm) ID hose through the hole in the back of the dispenser
marked “drain” and up to the drip tray fitting located on the dispenser under the drip tray.
C. Attach the hose to the drip tray fitting on the dispenser.
D. Connect the other end of the hose to a suitable drain source, ensuring compliance with all fed-
eral, state and local codes.
E. Slide the drip tray back into place.
12. Purging Air from the Water Coil
A. Prior to initial use, purge all air from the valves by pushing the dispensing switch repeatedly. Con-
tinue until a steady flow of water is observed.
B. Repeat for the remaining valves.
NOTE: Splashing may occur during the purge cycle.
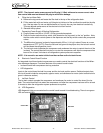
13. Programming the Portion Control
A. If the dispenser comes equipped with the optional Portion Control feature, they
have been pre–programmed from the factory to pour 7–, 12–, and 16–ounce
drinks. The extra large (pitcher icon) size has also been pre–programmed to
pour 16 ounces. To change the pour sizes, please follow the instructions below.
1. Simultaneously press and hold the “small” and “extra large” push button
switches on the Portion Control Module until the “refill” light starts blink-
ing. Release the switches. The blinking refill light indicates the program-
ming mode is active.
2. Place the cup under the dispense nozzle and push the selected size button (small,
medium, large, or extra large). Hold the button until the cup fills to the desired portion,
then release the button. Repeat the above procedure for the remaining sizes.
3. After programming all the drink sizes, press and release the “cancel/pour” switch to return
the Portion Control to the operational mode. The blinking refill light will go out.
B. If at a future date it is decided to change the portion size of the drinks, the individual sizes can be
adjusted following the above procedure. It is not necessary to reprogram every size. Additionally,
the Portion Control has full memory retention in case of a power failure.
C. To pour a drink without using a pre–programmed Portion Control size, simply push and hold the
“cancel/pour” button and release when the cup is full.
14. Connecting the Concentrate & Priming the Pumps
A. Connect the 3/8” barb fittings to the B&B supply line.
NOTE: Do not cut any of the lines coming from the rear of the dispenser. The excess slack is
needed to be able to slide the pump platform out of the front of the base for maintenance access.
B. Route the concentrate supply lines to the B–I–B location and attach the supplied plastic B–I–B
connector to the end of each line with the clamps provided.
C. Turn off the water supply and connect the concentrate lines to their respective B–I–B.
D. Depress and hold each start button until concentrate is observed flowing from the nozzle.
E. Turn on the water supply.
15. Apply Sealant to Base and Countertop
If the legs supplied with the dispenser are not used to raise the dispenser off the counter, the entire
perimeter of the base must be sealed at the countertop with silicone (or other food grade approved seal-
ant) in order to comply with NSF standards.