


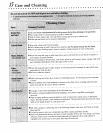

Self-Clean Oven
Care and Cleaning
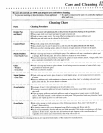
Setting the Controls for a Self-Clean Cycle
The self-clean cycle uses above nonnat cooking tempera-
tures to automatically clean the entire oven interior, While
this occurs, a device in the oven vent helps consume normal
amounts of smoke. The oven is vented through an opening
under the control panel.
NOTE: Both ovens cannot be self-cleaned at the same time
in double wall oven models.
It is normal for flare-ups, smoking or flaming to occur during
cleaning if the oven is heavily soiled.
It is better to clean the oven regularly rather than to wait until
there is a heavy build-up of soil in the oven.
During the cleaning process, the kitchen should be well
ventilated to help eliminate normal odors associated with
cleaning.
Do not use commercial oven cleaners on the self-clean oven
finish or around any part of the oven as they will damage the
finish or parts.
Before Self-Cleaning
Remove broiler pan, all pans and the oven racks from the
oven. The oven racks will discolor and may not slide easily
after a self-clean cycle.
Clean oven frame, door frame (area outside the door gasket)
and around the opening in the door gasket with a non-
abrasive cleaning agent such as Bon Ami* or detergent and
water. These areas are not exposed to cleaning temperatures
and should be cleaned to prevent soil fi'om baking on during
the clean cycle.
To prevent damage, do
not clean or rub the gas-
ket around the oven door.
The gasket is designed to
seal in heat during the
clean cycle.
"Wipe up excess grease or
spillovers from the oven
bottom to prevent exces-
sive smoking, flare-ups or flaming during the clean cycle.
For ease of cleaning, the heating element can be lifted slightly
(1 to 1-112 inches).
Wipe up sugary spillovers and acid spillovers such as lemon
juice, tomato sauce or milk-based sauces. Porcelain enamel
is acid resistant, not acid proof. The porcelain finish may
discolor if acid spills are not wiped up prior to a self.clean
cycle.
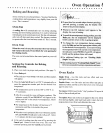
1. Close the oven door.
2. Press the Clean pad.
• The indicator words CLEAN TIME will flash and the
display will show " HR: ", (Double wall oven
models will also have a"U" or "L" indicating upper or
lower oven.)
3. Press Auto Set (0) pad and "3:00" hours will appear in the
display lbr an average soiled oven.
• The cleaning time can be varied depending on the
amount of soil. After "3 :Off' appears in the display, press
the number 2 pad and enter "2:00" hours of cleaning for
light soil. Tile number 4 pad will enter "4:00" hours for
heavy soil.
• Five seconds after entering the cleaning time, the oven
door will automatically latch and the cooling fan will
come on.
• The indicator words LOCK and ON wil! come on when
the door is latched,
• The indicator word ON will cycle with the elements as
the cleaning temperature is maintained.
4. When the cleaning time has been completed, the indicator
words CLEAN and ON will go off, The indicator word
LOCK and the cooling fan will remain on until the oven has
cooled and the door has unlocked.
After Self-Cleaning
About one hour after the end of the clean cycle, the loc-
will disengage and the LOCK indicator word will turn off
At this point, the door can be unlocked and opened.
Some soil may leave a light gray, powdery ash which can be
removed with a damp cloth. If soil remains, it indicates tha
the clean cycle was not long enough. The soil will be re-
moved during the next clean cycle.
If the oven racks were left in the oven and do not slid_
smoothly after a clean cycle, wipe racks and embossed rac!
supports with a small amount of vegetable oil to restore east
of movement.
A white discoloration may appear after cleaning if acid o
sugary foods were not wiped up before the clean cycle. Thi
is normal and will NOT affect performance.
* Brand names for cleaning products are registered trade
marks of the respective manufacturers.