


55
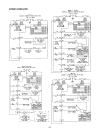
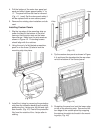
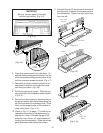
Removing Access and Door Panels
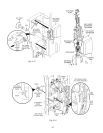
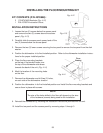
1. Loosen but do not remove the two (2) toe
panel screws below the access panel. Re-
move and set aside the two (2) screws above
the access panel.
(Fig. 4-1)
2. Remove the access panel assembly by slid-
ing it upward to clear the loosened screws.
This access panel will be replaced by new a
new custom panel assembly.
(Fig. 4-1)
3. Remove the two (2) screws from the bottom
of the outer door panel.
(Fig. 4-1)
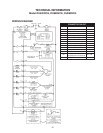
Section Four
INSTALLATION CONSIDERATIONS
INSTALLING CUSTOM PANEL ACCESSORY KIT
Installation Instructions
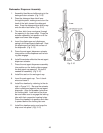
In many instances, customers want to integrate the undercounter dishwasher appearance with overall
kitchen design by installing panels of wood matching that used in the cabinets. After the two panels -
an upper panel and a lower panel - are cut and finished as described below, use the materials in the
Dishwasher Custom Panel Accessory Kit to install them by following the installation instructions.
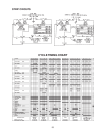
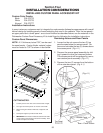
Custom Panel Dimensions
NOTE: A ¼” thickness (actual 7/32”) can be used
for wood panels. If using thicker material, edges
must be routed to 7/32” as shown in box below.
7/32"
Max.
1" Min.
Required on
top and bottom
edges
18-21/32"
22-13/16"
Upper
panel
Lower
panel
45
Min.
ø
45
Min.
ø
7/32" Max.
1/4"
Min.
1/4"
Min.
4-7/16"
23-5/16"
(Fig. 4-1)
CUTTING NOTES:
1. Custom panel for the door cannot exceed 8 lbs. weight.
2. The upper and lower panels are not the same width.
3. Match wood grain direction with that of adjacent cabi
znets.
4. Sand panel edges to provide smooth finish.
5.
IMPORTANT:
Use moisture resistant sealer on both sides
and all edges of the panels to protect from humidity. Dish
washer is subject to humidity.
Custom Color Panels:
Black P/N 675775
White P/N 675776
Almond P/N 675777