


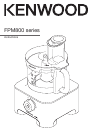


thermoresist blender
bm
filler cap
bn
lid
bo
g
oblet
bp
sealing ring
bq
blade unit
br
f
iller cap vents
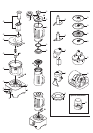
attachments
bs
k
nife blade
bt
dough tool
ck
d
ual whisk
cl
f
olding tool
cm
max capacity disc
cn
4
mm slicing/grating disc
co
2mm slicing/grating disc
cp
extra fine grater disc
cq
fine Julienne disc
cr
mini bowl and blade
cs
attachment storage box
ct
compact chopper/grinder (optional)
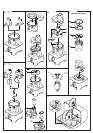
to use your food processor
1 Fit the bowl to the power unit. Place the handle towards the
back on the right hand side and turn clockwise
1
until it locks.
2 Fit an attachment over the bowl drive shaft.
Note: Detachable drive shaft
2
should be fitted when
using the discs, mini bowl, whisk and folding tool.
●
Always fit the bowl and attachment onto the processor before
adding ingredients.
3 Fit the lid
3
- ensuring the top of the drive shaft/tool locates into
the centre of the lid.
●
The processor will not operate if the bowl or lid are
not fitted correctly into the interlock. Check that the
feed tube and bowl handle are situated to the right
hand side.
4 Plug in. The Power On light will come on and flash until the bowl
and lid are fitted correctly. Select one of the following options: -
Auto Button – the light will come on when the Auto Button is
pressed and the optimum speed for the attachment will be
automatically selected.
Speed Control – manually select the required speed (refer to the
recommended speed chart).
Pulse – use the pulse (P) for short bursts. The pulse will operate
for as long as the control is held in position.
5 At the end of processing turn the speed control to the ‘O’ off
position or if using the Auto press the button and the light will go
out.
●
The Power On light will flash if either the lid or bowl
are not fitted or incorrectly fitted.
●
The Auto Button will not operate if a speed is
selected on the speed control.
●
Always switch off and unplug before removing the lid.
important
●
Your processor is not suitable for crushing or grinding coffee
beans, or converting granulated sugar to caster sugar.
Eco function
If the food processor is left plugged in for over 30 minutes
without being used, it will go into standby mode to reduce
e
nergy consumption.
●
The Power On light will pulse slowly and the food processor will
not operate until one of the following actions are carried out:-
●
T
he Auto Button is pressed.
●
T
he speed control is turned to a speed and then turned back to
the ‘O’ off position.
The light will change to being constantly lit when ready to use.
N
ote: If the bowl or lid are not engaged into the interlock the
p
ower on light with pulse more rapidly than the Eco function.
to use your thermoresist blender
1 Fit the sealing ring
bp
into the blade unit
bq
- ensuring the seal is
located correctly in the grooved area.
●
Leaking will occur if the seal is damaged or
incorrectly fitted.
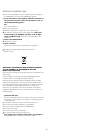
2 Hold the underside of the blade unit
bq
and insert the blades
into the goblet - turn anti-clockwise until it clicks
4
. Refer to the
graphics on the underside of the blade unit as follows:
- unlocked position
- locked position
The blender will not work if incorrectly assembled.
3 Put your ingredients into the goblet.
4 Fit the lid to the goblet and push down to secure
5
. Fit the filler
cap.
5 Place the blender onto the power unit, and turn clockwise
6
to
lock.
●
The appliance will not operate if the blender is
incorrectly fitted to the interlock.
6 Select Auto, or a speed (refer to the recommended speed chart)
or use the pulse control.
safety
●
SCALD RISK: Hot ingredients should be allowed to cool to
room temperature before blending.
●
Always take care when handling the blade assembly and avoid
touching the cutting edge of the blades when cleaning.
●
Only operate the blender with the lid in place.
●
Only use the goblet with the blade assembly supplied.
●
Never run the blender empty.
●
To ensure the long life of your blender, do not run it for longer
than 60 seconds.
●
Smoothie recipes - never blend frozen ingredients that have
formed a solid mass during freezing, break it up before adding to
the goblet.
●
Important - The skirt on the base of the goblet is fitted during
manufacture and no attempt should be made to remove it.
4