


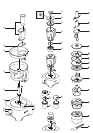
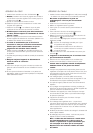

to use your food processor
1 Fit the detachable shaft onto the power unit ᕡ.
2 Then fit the bowl. Place the handle towards the back and
turn clockwise until it locks ᕢ.
3 Fit an attachment over the drive shaft.
●
Always fit the bowl and attachment onto the processor
before adding ingredients.
4 Fit the lid ᕣ - ensuring the top of the drive shaft locates into
the centre of the lid.
●
Do not use the lid to operate the processor,
always use the on/off speed control.
5 Plug in and the power on light will come on. Switch on and
select a speed. (Refer to the recommended speed chart).
●
The processor will not operate if the bowl or lid
are not fitted correctly to the interlock. Check
that the feed tube and bowl handle are situated
to the right hand side.
●
Use the pulse (P) for short bursts. The pulse will operate for
as long as the control is held in position.
6 Reverse the above procedure to remove the lid, attachments
and bowl.
●
Always switch off and unplug before removing the
lid.
important
●
Your processor is not suitable for crushing or grinding coffee
beans, or converting granulated sugar to caster sugar.
●
When adding almond essence or flavouring to mixtures
avoid contact with the plastic as this may result in
permanent marking.
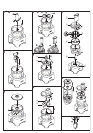
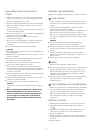
to use your liquidiser
1 Fit the sealing ring ቱ into the blade unit ቲ - ensuring the
seal is located correctly. Leaking will occur if the seal
is damaged or incorrectly fitted.
2 Screw the goblet onto the blade assembly.
3 Put your ingredients into the goblet.
4 Push the lid seal onto the underside of the lid.
5 Fit and lock the filler cap in the lid, by turning one position
.
6 Fit the lid to the goblet and turn the filler cap to to
lock.
The filler cap can be located in 3 different positions (see A)
- filler cap removable for adding ingredients to the
goblet.
- lid unlocked/filler cap locked to the lid for fitting and
removing the lid.
- lid locked.
7 Place the liquidiser onto the power unit and turn to lock ᕤ.
●
The appliance will not operate if the liquidiser is
incorrectly fitted to the interlock.
8 Select a speed (refer to the recommended speed chart) or
use the pulse control.
●
Liquids should be allowed to cool to room
temperature before blending.
hints
●
When making mayonnaise, put all the ingredients, except the
oil into the liquidiser. Then with the machine running, pour the
oil into the filler cap and let it run through.
●
Thick mixtures, eg pates and dips, may need scraping
down. If it’s difficult to process, add more liquid.
●
Ice crushing - operate the pulse in short bursts until crushed to
the desired consistency.
●
To ensure the long life of your liquidiser, never run it for longer
than 60 seconds. Switch off as soon as you’ve got the right
consistency.
3
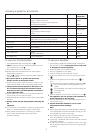
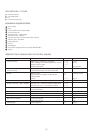
choosing a speed for all functions
tool/Attachment function speed maximum
capacities
knife blade One Stage Cake Mix 1 – 8 1.5Kg
Pastry - rubbing fat into flour 5 – 8 340g
Adding water to combine pastry ingredients 1 – 5
Chopping/pureeing/pates 8 600g
knife blade with maxi-blend canopy Soups – start at a low speed and move up to Max 1 – 8 1.5 litres
whisk Egg Whites 8 6 Egg Whites
Egg & sugar for fatless sponges 8
Cream 5 – 8 500 mls
dough tool Yeasted mixes 8 600g
discs – slicing/grating/chipping Firm food items such as carrots, hard cheese. 5 – 8
Softer items such as cucumbers, tomatoes 1 – 5
rasping disc Parmesan cheese, Potato for German potato dumplings 8
citrus juicer Citrus fruits 1
mini bowl All processing 8 200g
liquidiser All processing 8 1.5 litres
mini chopper/mill Herbs 8 10g
Nuts & Coffee Beans 8 50g
centrifugal juicer Fruits & Vegetables 8 500g