


●
The processing of spices is not recommended as they may
damage the plastic parts.
●
The appliance will not work if the liquidiser is incorrectly
fitted.
●
To blend dry ingredients - cut into pieces, remove the filler
cap, then with the appliance running, drop the pieces down
one by one. Keep your hand over the opening. For best
results empty regularly.
●
Don’t use the liquidiser as a storage container. Keep it
empty before and after use.
●
Never blend more than 1
1
⁄2 litres - less for frothy liquids like
milkshakes.
Note: The mini chopper/mill base is not
interchangeable with the glass liquidiser goblet.
The processor will not operate if the wrong base
is fitted. Refer to graphics on blade unit bases.
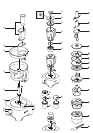
to use your mini chopper/mill
Use the mini chopper/mill for milling herbs, nuts and coffee
beans.
1 Put your ingredients into the jar.
2 Fit the sealing ring into the blade unit ታ.
3 Turn the blade unit upside down. Lower it into the jar, blades
down.
4 Screw the blade unit onto the jar until it is finger tight.
5 Place the mini chopper/mill onto the power unit and turn to
lock ᕥ.
6 Switch on to maximum speed or use the pulse control.
7 After milling, you can replace the blade unit with the sprinkler
lid and shake out your food.
●
The sprinkler lid is not airtight.
safety
●
Never fit the blade unit to your food processor without the
jar fitted.
●
Never unscrew the jar while the mini chopper/mill is fitted to
your appliance.
●
Do not touch the sharp blades – Keep the blade unit away
from children.
●
Never remove the mini chopper/mill until the blades have
completely stopped.
●
To ensure the long life of your mini chopper/mill, never run
for longer than 30 seconds. Switch off as soon as you have
got the right consistency.
●
The processing of spices is not recommended as they may
damage the plastic parts.
●
The appliance will not work if the mini chopper/mill is
incorrectly fitted.
●
Use for dry ingredients only.
hints
Herbs are best milled when clean and dry.
●
Note: The mini chopper/mill base is not
interchangeable with the glass liquidiser goblet.
The processor will not operate if the wrong base
is fitted. Refer to graphics on blade unit bases.
using the attachments
Refer to recommended speed chart for each attachment.
knife blade
The knife blade is the most versatile of all the attachments.
The length of the processing time will determine the texture
achieved. For coarser textures use the pulse control.
Use the knife blade for cake and pastry making, chopping
raw and cooked meat, vegetables, nuts, pate, dips,
pureeing soups and to also make crumbs from biscuits and
bread.
hints
●
Cut food such as meat, bread, vegetables into cubes
approximately 2cm/
3
⁄4in before processing.
●
Biscuits should be broken into pieces and added down the
feed tube whilst the machine is running.
●
When making pastry use fat straight from the fridge cut into
2cm/
3
⁄4in.cubes.
●
Take care not to over-process.
dough tool
Use for yeasted dough mixes.
●
Place the dry ingredients in the bowl and add the liquid
down the feed tube whilst the machine is running. Process
until a smooth elastic ball of dough is formed this will take
60 - 90 secs.
●
Re-knead by hand only. Re-kneading in the bowl is not
recommended as it may cause the processor to become
unstable.
twin beater geared whisk
Use for light mixtures only eg egg whites, cream, evaporated
milk and for whisking eggs and sugar for fatless sponges.
Heavier mixtures such as fat and flour will damage it.
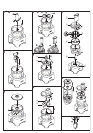
using the whisk
1 Fit the drive shaft and bowl onto the power unit.
2 Push each beater securely into the drive head .
3 Fit the whisk by carefully turning until it drops over the drive
shaft.
4 Add the ingredients.
5 Fit the lid - ensuring the end of the shaft locates into the
centre of the lid.
6 Switch on.
important
●
The whisk is not suitable for making one-stage
cakes or creaming fat and sugar as these mixes
will damage it. Always use the knife blade for
cake making.
hints
●
Best results are obtained when the eggs are at room
temperature.
●
Ensure the bowl and whisks are clean and free from grease
before whisking.
●
Carefully fold in flour and sugar by hand using a metal spoon
for fatless sponges and meringues.
4