


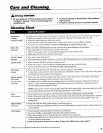

Cleaning Chart Continued
Parts Cleanin(i Procedure
OvenRacks • Cleanwith soapy water.
• Removestubbornsoilwith cleansingpowder orsoap-filledscouring pad. Rinseand dry.
PlasticFinishes • Whencool,cleanwith soap and water,rinseand dry.
Doorhandles • Useaglasscleanerand a softcloth.
Backguardtrim
Endcaps NOTE:Neveruse ovencleaners,abrasiveor causticliquid orpowdered cleanserson plasticfinishes.Thesecleaning
agentswillscratchor marfinish.
NOTE:Toprevent stainingor discoloration,wipeup fat,greaseor acid (tomato,lemon,vinegar,milk,fruit juice,
marinade)immediatelywith a dry paper towel or cloth.
Maintenance
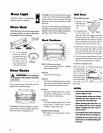
Oven Door
3. Lift up evenly until door clears hinge 3. Do not close the oven door until the
A CAUTIONS: arms. oven racks are in place.
Scratching, hitting, jarring or stressing
• Do not place excessive weight To replace: theglassmay weakenits structurecaus-
on or stand on an open oven
door. This could cause the range 1. Grasp door at eachside, inganincreasedriskofbreakageatalater
date.
to tip over, break the door, or 2. Align slots in the door with the hinge
injure the user. arms on the range.
• Do not attempt to open or close 3. Slide the door down onto the hinge Storage Drawer
door or operate oven until door armsuntilthe dooriscompletelyseated
is properly replaced, on the hinges. Push down on the top The storage drawer at the bottom of the
• Never place fingers between corners of the door to completely seat range is safe and convenient for storing
hinge and front oven frame, door on hinges. Door should not ap- metal andglass cookware. DONOTstore
Hingearms arespring mounted, pear crooked, plastic, paperware, food or flammable
If accidentally hit, the hinge will material in this drawer. Remove drawer
NOTE:The oven door on a new range to clean under range.
slam shut against oven frame may feel "spongy" when it is closed.
and could injure your fingers. This is normal and will decrease with To remove: Empty drawer then pull out
to the first stop position. Lift up front of
use.
To remove: drawer and pull to the second stop posi-
tion. Grasp sides and lift up and out to
1. When cool, open the oven door to the Oven Window remove drawer.
first stop position (opened about four
inches). , , To protect the oven door window: To replace: Fit the ends of the drawer
2. Grasp door at __ 1. Do not use abrasive cleaning agents glides onto the rails.Lift up drawer front
each side. Do such as steel wool scouring pads or and gently push in to first stop position.
not use the door _ powdered cleansersastheymayscratch Liftup and continue toslide drawer tothe
handle to lift the glass, closedposition.
door. 2. Do not hit the glass with pots, pans,
furniture, toys, or other objects.