


38
SECTION 4
MAINTENANCE
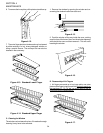
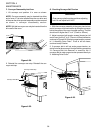
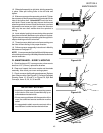
G. Checking Conveyor Belt Tension
WARNING
Oven conveyor belt must be cool when adjusting
belt. Do not adjust belt if HOT.
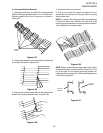
1. With the conveyor assembly in the oven, stand at one
end of conveyor and check tension by lifting the conveyor
belt at the center of the oven chamber opening. The belt
should not lift higher that 3″ to 4″ (75mm to 102mm).
2. Adjust conveyor belt tension screws (located on left
end of oven) for the 3″ to 4″ (75mm to 102mm) deflection
as shown in Figure 4-26. If there is proper tension, proceed
to “J. Attaching Drive Chain”. If belt is still too loose,
continue to step 3 below.
3. If conveyor belt is still not under proper tension, an
entire link must be removed. Use the following procedure
“H. Conveyor Belt Link Removal” to remove a link. If
conveyor belt is under proper tension proceed directly to
“J. Attaching Drive Chain”.
Figure 4-26.
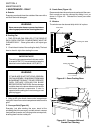
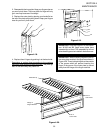
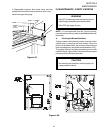
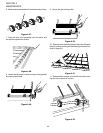
F. Conveyor Reassembly Into Oven
1. Lift conveyor and position it in oven as shown.
NOTE: Conveyor assembly may be inserted into either
end of oven. If it is to be installed from the non-drive end
of the oven the drive sprocket assembly must be removed
as shown in conveyor disassembly section.
NOTE: Split belt conveyors can only be inserted from the
drive end of the oven.
Figure 4-24.
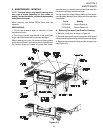
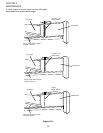
2. Reinstall the conveyor rear stop. Reinstall the con-
veyor end stop.
Figure 4-25.
Middleby
Marshall
Conveyor Rear Stop
Conveyor End Stop