


10
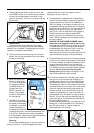
• If the kneading blade remains in the bottom of the
loaf of bread, use the end of a plastic spoon or
other non-metal utensil to remove. Always check to
see where the kneading blade is when removing a
baked loaf of bread. If it remains stuck in the bread
you may accidentally damage it by cutting into it
while slicing.
Using the timer for delayed
completion
Use the TIMER when you would like to delay the
completion of your bread. This feature allows you to
delay the bake time for up to 12 hours plus the cycle
time. For example, you can set the TIMER in the evening
and wake to fresh bread the following morning.
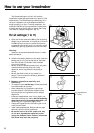
NOTE: Be sure you have followed the ‘How to Use
Your Breadmaker’ steps 1-6 in preparing the
ingredients in the baking pan. It is not recommended
that you use the ‘Delayed Completion’ function and
TIMER with recipes that call for fresh ingredients which
might be spoiled such as eggs, fresh milk, sour cream,
or cheese.
1
To set the TIMER, determine when you would like
your bread to be finished.
• For example, if it is 8pm when you place all your
ingredients in the baking pan and you would like
to wake up to the aroma of fresh-baked bread at
8am, you will want a total of 12 hours before your
bread is complete. Once you have chosen the
appropriate setting for your recipe (for example, if
you are doing a Sweet bread, you will push SELECT
until 8 is showing in the display), you simply set the
TIMER to bring it up to your total hours – in this
case 12 hours.
2
Press the ▲ arrow on the control panel and 3:25 –
the timer for setting 8 – will automatically come up
in the display window. Continue to Press ▲ until
the display reads 12:00 (or is as close to this as
possible, since your timer moves in 10 minute
increments, your actual reading for this setting will
be 11:55 or 12:25).
• You do not need to mathematically calculate the
difference between the setting time (3:25) and the
total hours you want (12:00). The machine will
automatically adjust to include the setting time.
Simply set the TIMER for your total hours (12).
• If you pass the desired time, simply press ▼ to go
back.
3
Once you have set the time, press START. The colon
(:) in the display will flash to indicate that the
TIMER has been set and the countdown will begin.
The TIMER will count down in one-minute
increments. When the display reaches END, your
bread is complete and the beeper will sound.
4
If you make a mistake while setting the TIMER,
press and hold the STOP button until it beeps. This
will clear the display and you can set the TIMER
again.
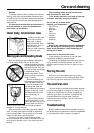
Slicing and storing bread
For best results place bread on a wire rack and
allow to cool for 15 to 30 minutes before slicing. You
may use an electric knife for even slices. Otherwise, use
a sharp knife with a serrated blade.
Store unused bread tightly covered at room
temperature for up to three days. If weather is hot and
humid, store in the refrigerator overnight. For longer
storage (up to one month), place bread in a tightly
covered container in the freezer. If you store the bread
in the refrigerator, leave it out to bring it to room
temperature before serving. Since homemade bread
has no preservatives it tends to dry out and become
stale faster than commercially made bread.
Leftover slightly hardened bread may be cut into
1.3 cm (half inch) or 2.5cm (1 inch) cubes and used in
favourite recipes to make croutons, bread pudding, or
stuffing.