


9
4
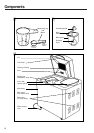
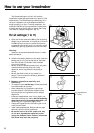
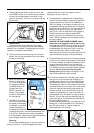
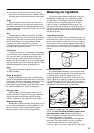
Place the baking pan back into the unit. with the
word FRONT on the rim of the Pan facing towards
the front of the Breadmaker. Push down on the
pan until you hear it click firmly into place. Fold the
handle down.
Special Note
If the baking pan is not installed in the proper
orientation or firmly clicked into place the kneading
blade will fail to operate. The baking pan can only be
installed in one position as indicated.
5
Close the lid and connect the plug to an electrical
socket. You will hear a beep sound and the display
window will be blank.
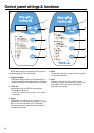
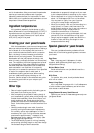
6
Select the appropriate
setting for your recipe
(1-11 or 0-12 dependent
on model) by pressing
the SELECT button on
the pad. Each time
SELECT is pressed, the
number in the display
window will advance to
the next setting.
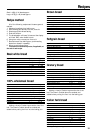
7
Press START. The baking
time in hours and minutes
will appear in the display.
For example, if you chose
a recipe using setting 1,
the display will show 2:45. It will count down the
remaining bake time in one-minute decrements (2:44,
2:43, etc) until the bread is done. When the baking
time is completed, a signal tone will sound three times
and the display window will flash ‘END’.
Warning
Do not place the baking pan or any other object on
the top of the unit. To avoid damaging the bread
makers surface, do not put any object or the hot
baking pan on top of the unit.
8
This Breadmaker is designed with a ‘Keep Warm’
function that automatically begins when the BAKE
time is completed. At the end of the BAKE cycle
‘END’ will appear (in the display window) up to 60
minutes after baking is complete and will keep the
bread warm during that time. You may remove the
baking pan at any time during the ‘Keep Warm’
cycle. To turn off the ‘Keep Warm’ feature before
the 60 minutes are up, simply press the STOP
button and hold it for 3 seconds until you hear a
‘beep’. END will disappear and the display window
will now be blank.
•
UNPLUG THE UNIT WHEN FINISHED. Never
leave the unit plugged in when not in use.
The ‘Keep Warm’ feature is not provided for the jam
or DOUGH settings 5. If you keep finished dough in
the Breadmaker over a period of time, it may over-
rise and produce poor results. For best results,
remove dough at the end of the cycle and follow the
recipe directions for shaping, resting and baking.
9
This Breadmaker has a convenient Viewing Window
so that you may watch the progress of the bread as
it is mixed, kneaded, and baked. Occasionally some
moisture may be formed in the window during
processing. If moisture forms, you may lift the lid to
look inside during the mixing and kneading stages,
however
do not open the lid during the
baking cycle
(approximately the last hour or so)
as this may cause the bread to collapse.
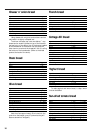
10
To remove the bread from the baking pan, use an
oven glove or oven mitts and pull straight up on
the baking pan handle. Turn the pan upside down
and shake the bread out onto a wire cooling rack.
The baking pan has a non-stick coated finish so that
the bread should come out easily. Do not use metal
utensils to remove bread as they may scratch the
non-stick coating. If you have difficulty removing
bread from the baking pan, slide a flat rubber or
plastic spatula along the sides of the pan to loosen
the loaf. Turn the pan over and shake the loaf out.
Allow the bread to cool before slicing (See ‘Slicing
and Storing Bread’ page 11).
• If the kneading blade remains in the bottom of the
baking pan, it may be necessary to fill the baking
pan with warm water in order to loosen the
kneading blade from the shaft.
K
L
M
ON