


5
Using your Product
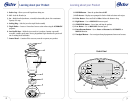
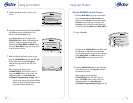
5 Set the jar onto the base.
6 Plug the power cord into a standard household
120/127-volt, 60 Hz. AC outlet. You are now ready
to start.
Set Up
1 Press the POWER button. All the lights blink on
briefly and you will hear a greeting sound as the
Welcome screen appears. The POWER light
stays on, meaning the product is ready to use.
Each time you press one of the buttons, you will
hear a tick sound.
If you do not have the jar or another attachment
placed on the base, a screen will ask you to put
one in place.
Next, Tutorial screens appear briefly explaining
the different functions of the touchpad and
MANUAL buttons. Follow the instructions on
these screens.
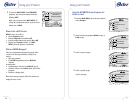
2 Press the arrow button beside the blinking NEXT
to page through the tutorial screens.
3 To skip the Tutorial screens in the future, press
the button beside the arrow on the screen. If you
want to view the tutorial every time you turn on
the product, press the arrow button beside the
blinking NEXT.
Cont’d. next page
Using your Product
4
Welcome to the
Oster
®
New Technology
Blender
To skip tutorial
screens in the future
press this button
NEXT BACK
Before you use the product for the first time, separate
the lid, feeder cap and blades from the jar. Wash in
warm, soapy water. Rinse and dry well.
Assembly
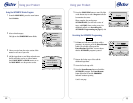
1 Check to ensure the sealing ring is properly
seated on the ledge surrounding the triple blades.
2 Turn the jar upside down.
3 Turn the triple blades upside down and twist them
into the bottom of the jar. You can use the feeder
cap as a tool to twist the blades securely in place.
Be sure the triple blades are locked securely to
the jar before using.
4 Wrap the power cord around the cord storage
area on the base of the product until the cord is
the length you desire.