


4
Rinse Aid
This product makes dishes sparkle and helps them to dry
without spotting. The dispenser is located on the inside panel
of the door.
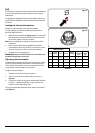
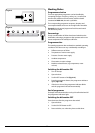
When the low rinse aid indicator (Fig.2-5) lights you must
add rinse aid.
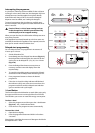
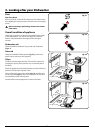
Loading the rinse aid
To load the rinse aid:
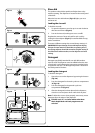
1. To open the dispenser, turn the cap in an anti-clockwise
direction and remove (Fig.2-6).
2. Pour in the rinse aid, making sure not to overfill.
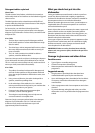
Regulate the amount of rinse aid used for each cycle by
turning the dose adjuster (Fig.2-7), located beneath the cap,
with a screwdriver.
There are 6 different settings the normal dosage setting is 3.
IMPORTANT: Proper dosage of rinse aid improves drying.
If drops of water remain on the dishes or spotting occurs,
the dosage adjuster should be turned to a higher setting. If
the dishes have white streaks, turn the adjuster to a lower
setting.
Detergent
Detergent specifically intended for use with dishwashers
must be used. The dispenser must be refilled before the start
of each wash cycle following the instructions provided in the
‘Programme overview’. The detergent dispenser is located on
the inside panel of the door.
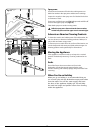
Loading the detergent
To load the detergent:
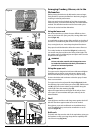
1. Open the cover on the dispenser by pressing the button
(Fig.2-8).
2. Pour the detergent for the wash cycle into compartment
‘A’ (Fig.2-9).
3. Pour the detergent for the prewash cycle into
compartment ‘B’ (Fig.2-9).
4. After the detergent has been placed in the dispenser,
close the cover and press down until it clicks in place.
Note: To allow the cover to close properly, remove any excess
detergent from the edges of the dispenser.
DO NOT use 3-in-1 or similar tablets when Heat
Wash, Rapid Wash and Soak programmes are
selected.
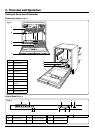
ArtNo.800-0205 -
Low rinse aid indicator
ArtNo.800-207 - Dispenser - Removing the rinse aid cap
ArtNo.800-208 - Dispenser -
Adjusting the rinse aid setting
ArtNo.800-209 - Dispenser - Detergent compartment
ArtNo.800-210 - Dispenser - Loading the detergent
Fig.2-5
Fig.2-6
Fig.2-7
Fig.2-8
Fig.2-9