


21 U108910
INSTALLATION
Check the appliance is electrically safe when you have finished.
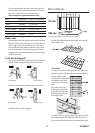
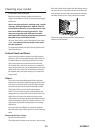
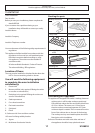
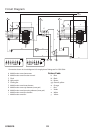
3) Ensure the stability bracket top arm is above the rear
channel. See diagram.
X
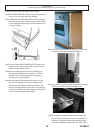
4) Jack up the front roller until the appliance unit just
touches the worktop and screw down the two front
adjusting screws using a 7mmm socket until the top
of the appliance is in contact all along the underside
of the worktop.
5) Remove the pin from the front roller and swing the
roller inside the appliance.
6) Adjust the rear rollers to bring the front trims level with
the cabinet doors and screw down the rear adjusting
feet using a 7mm socket.
7) Secure the stability bracket in place by slackening the
nut x and pushing the top arm down until it firmly
contacts the rear channel. Retighten the nut.
8) Retighten down the two rear feet using the 7mmm
socket to ensure the rear channel is firmly in contact
with the stability bracket.
Leave the levelling tool and Allen key with the front roller.
Fitting the plinth
Fit the plinth to the cabinet.
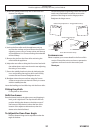
Refit the drawer
Rest the drawer back on the side runners and, keeping it
level, push it right back. The clips should click into
position holding the drawer to the side runners. If
the bottom of the drawer is above the line of the
bottom of the adjacent cabinet doors, then the
drawer trim should be fitted.
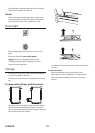
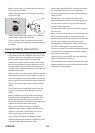
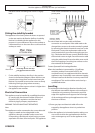
To Adjust the Oven Door Angle
The door bottom hinge can be adjusted to alter the
angle of the door.
Loosen the bottom hinge fixing screws and use the
notch and a flat bladed screwdriver to move the
position of the hinge to set the hinge position.
Retighten the hinge screws.
Effect of hinge adjustment – exaggerated for clarity
Centre line of hinge pin
Oven door omitted for clarity
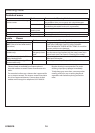
Customer care
Please complete your contact details in the front of this
section. Please inform the user how to operate the
appliance and hand over the instruction pack.
Thank you.