


MAKING L.P. GAS ADJUSTMENTS
If you are using L.P. (bottled) gas, all the
adjustments described below must be
made before you make any burner ad-
justments or use the range.
To adjust your range for use with L.P.gas, follow the steps
below.
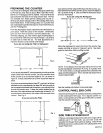
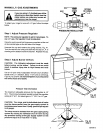
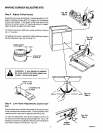
Step 1: Adjust Pressure Regulator
NOTE: The pressure regulator is set for natural gas. To
use L.P. gas, the regulator must be adjusted.
Raise the cooktop and findthe pressure regulator at the end
of the manifold pipe on the left side of the range.
Unscrew the cap and remove the spring retainer, Fig. A1.
Turn the retainer over and put it back into the cap so L.P. is
showing on the bottom end of the retainer. Replace the cap.
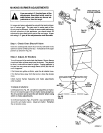
Step 2: Adjust Burner Orifices
CAUTION: The following adjustment must be made
before turning on the burner. Failure to do so could
result in serious injury due to high flames and toxic
tumes.
Use a 1/2" open end or adjustable wrench to turn all orifice
hoods in the L.P. direction, about 1-1/2" turns or until snug,
Figs. A2, A3, and A4. Do not overtlg hten or you may bend
the orifice hood and needle.
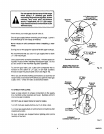
Pressure Test Information
The maximum allowable pressure for the regulator is 14"
W.C. The minimum pressure needed to check the regulator
setting is 5" W.C. for natural gas or 11" W.C. for L.P. gas.
CAUTION: The range and its Individual shut off valve
must be disconnected from the gas supply system at
test pressures of more than 1/2 psig. (pounds per square
inch gauge).
The range must be isolated from the gas supply piping
system by closing its individual shut off valve during
any pressure testing of the gas supply system at test
pressures equal to or less than 1/2 psig.
CAP
NAT.
SPRING
RETAINER
F-7
....
t = l I = _ I Iml I _,.Lt,=.(
PRESSURE REGULATOR
Fig. A1
Step 1
NAT.
Fig. A2
Step 2
NAT.
\
Fig. A3
Step 2
Fig. A4
Step 2
7 GINS66-2