


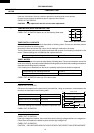

R-210A
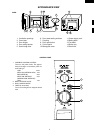
6
Note: The ON/OFF time ratio does not exactly corre-
spond to the percentage of microwave power,
because approx. 2 seconds are needed for heat-
ing up the magnetron filament.
SERVICING
WARNING TO SERVICE PERSONNEL
Microwave ovens contain circuitry capable of producing very high voltage and current. Contact with following parts
will result in electrocution.
High voltage capacitor, Power transformer, Magnetron, High voltage rectifier assembly, High voltage Fuse, High
voltage harness.
REMEMBER TO CHECK 4R
1) Reconnect all leads removed from components
during testing.
2) Replace the outer case (cabinet).
3) Reconnect the supply.
4) Run the oven. Check all functions.
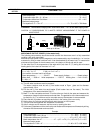
Microwave ovens should not be run empty. To test for
the presence of microwave energy within a cavity, place
a cup of cold water on the oven turntable, close the door
and set the power level to HIGH. And set the microwave
timer for two (2) minutes. When the two minutes has
elapsed (timer at zero) carefully check that the water is
now hot. If the water remains cold carry out 3D checks
and re-examine the connections to the component
being tested.
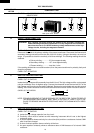
REMEMBER TO CHECK 3D
1) Disconnect the supply.
2) Door opened, and wedged open.
3) Discharge high voltage capacitor.
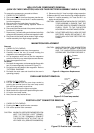
WARNING AGAINST THE CHARGE OF THE
HIGH-VOLTAGE CAPACITOR
The high-voltage capacitor remains charged
about 60 seconds after the oven has been
switched off. Wait for 60 seconds and then short-
circuit the connection of the high-voltage capaci-
tor (that is, of the connecting lead of the high-
voltage rectifier) against the chassis with the use
of an insulated screwdriver.
Sharp recommend that wherever possible fault-finding
is carried out with the supply disconnected. It may in,
some cases, be necessary to connect the supply after
the outer case has been removed, in this event carry out
3D checks and then disconnect the leads to the primary
of the power transformer. Ensure that these leads
remain isolated from other components and the oven
chassis. (Use insulation tape if necessary.) When the
testing is completed carry out 3D checks and reconnect
the leads to the primary of the power transformer.
When all service work is completed and the oven is fully assembled, the microwave power output should be checked
and microwave leakage test should be carried out.
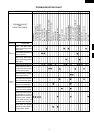
TROUBLESHOOTING GUIDE
When troubleshooting the microwave oven, it is helpful to follow the Sequence of Operation in performing the
checks. Many of the possible causes of trouble will require that a specific test be performed. These tests are given a
procedure letter which will be found in the "Test Procedure "section.
IMPORTANT: If the oven becomes inoperative because of a blown fuse 13A in the 1st. latch switch - 2nd. latch switch
- monitor switch circuit, check the 1st. latch switch, 2nd. latch switch and monitor switch before replacing
the fuse 13A.