


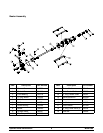

12
Model 390Operat ing Procedures
140804
Closing Procedures
To disassemble the model 390, the following item s will
be needed:
S T wo cleaning pails
S Sanitized stainless steel rerun can with lid
S Necessary brushes (provided with freezer)
S Cleaner
S Single ser vice towels
Draining Product From The
Freezing Cylinder
Step 1
Place the contr ol switch in the “OFF” posit ion as far
ahead of cleaning time as possible. This will allow
frozen pr oduct to soften for easier cleaning.
Step 2
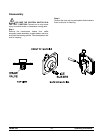
Remove the hopper c over, gasket, and feed tube.Take
these parts to the s ink for cleaning.
Step 3
If local health codes permi t the use of rerun,place
a sanit ized, NSF approved stainless steel r erun
container beneath the door spout. Place the control
switch in the “WASH” position and move the draw
handle to the right. When all the produc t stops flowing
from the door spout, m ove the draw handle to the left
and place the control switch in the “OFF” position.
Place a s anitized lid on the rerun container and place
it in the walk- in cooler.
(Note: For additional infor mation regarding the proper
use of rer un, see i tem 7 on page 15.)
Note: If local health codes DO NOTpermit theuse
of rerun, the product must bediscarded. Follow the
instruc tions in the previous step, except drain the
product into a pail and properly discar d the mix.
ALWAYS FOLLOW LOCAL HEALTH CODES.
Rinsing
Step 1
Pour two gallons (7.6 liters) of cool, clean water into
the mix hopper . Wit h the brushes provided, scrub the
mix hopper, mix inlet hole and mix level sensing
probes.
Step 2
With a pail beneath the door spout, place the control
switch in the “WASH” position and move the draw
handle to the right. Drain all the r inse water from the
freezing cy linder. When the rinse water stops flowing
from the door spout, m ove the draw handle to the left
and place the contr ol switch in the “OFF” posit ion.
Repeat this procedure until the rins e water being
drawn from the freezing c ylinder is clear.
Cleaning
Step 1
Prepare an approved 100 PPM cleaning solution
(examples: 2- 1/2 gal. [9.5 liter s] of Kay- 5R or 2
gal. [7.6 liter s] of Stera- SheenR). USE WARM WA-
TER AND FOLLOW THE MANUFACTURER’S
SPECIFICATIONS.
Step 2
Pour the cleaning solution into the hopper and allow it
to flow into the freezing cy linder.
Step 3
While the solut ion is flowing into the freez ing cylinder ,
brush clean the mix hopper, m ix inlet hole, and mix
level s ensing probes.
Step 4
Place the control switc h in the “WASH” position. This
will cause the cleaning solution to be agitated.
Step 5
Place an empty pail beneath the door spout and move
the draw handle tothe r ight. Draw off all of the cleaning
solution. Whenthe solution stops flowing from the door
spout, move the draw handle to the left and place the
control switc h in the “OFF” position.