


TW-357 REV E
23
Help Screens
The Help button provides help to the user at any point in the menu system. The help message is displayed and
the user is then prompted to press a button to return to the menu system.
Temperature
Thermocouple Select
The chamber temperature is monitored with 1 or 2 Type T thermocouples. The thermocouple is placed in the
chamber to monitor temperature level with the top rack. Factory installation includes one thermocouple inside
of the thermocouple tube at an elevation to match the height of standard racks. A second Type T thermocouple
may be added to monitor another location inside the chamber. Both thermocouples can be
activated/deactivated through the menu system. (MENU, 1, 1)
Calibrate Temperature
KRYOS provides easy calibration of the thermocouples. To calibrate, the user should enter the menu system
(MENU, 1,2). Remove the thermocouple from the thermocouple tube and dip thermocouple #1 into an ice
water bath. The fourth line of the control display will indicate “Wait” and will give a reading on the proximity
of the temperature to 0ºC. When the temperature reaches equilibrium the control will indicate “OK” and the
user can press the left soft-key button. Dry the thermocouple thoroughly. Next, the control will prompt you to
dip thermocouple #1 into LN2. Wait while the control reaches equilibrium at -196ºC (-320ºF). When it does,
the control will again indicate “OK” and the user can again press the left soft-key button. The control is now
calibrated. The thermocouple is now ready to be repositioned inside the thermocouple tube. Please note that
both thermocouples are calibrated by going through this process with Thermocouple #1.
Test Temperature System
The temperature circuitry can be checked at any time through the menu system (MENU, 1,3). This check will
tell if the thermocouples are working or if they are “open” (broken or unplugged). If a thermocouple is not
connected to the control it will check as “open.” If a thermocouple is “Disabled” through the menu system, it
will not show up on the check.
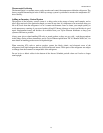
Level Sensing
The level sensing in the system is determined through the use of thermistor-based sensor assemblies.
Thermistors are thermal resistors whose resistances change as temperature changes. Their use in liquid level
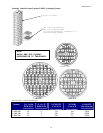
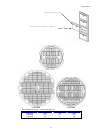
control is a time-tested method to provide accurate results. The KRYOS uses a 7-, 8- or a 4-thermistor
assembly to measure liquid level in the freezer. The 4-sensor assembly provides general information about
liquid level (high, normal, and low alarm) while the 7- and 8-thermistor assemblies provide liquid level
readings accurate to within one inch. When the LN2 level drops below the START FILL sensor, the control
opens the solenoid valve to commence the fill process. This process continues until the LN2 level reaches the
STOP FILL sensor. When the control “senses” that the LN2 has reached the upper level, it flashes “Check” on
the display while the KRYOS insures that it has not received false signals and then allows the fill to stop. The
fill process can be halted at any time before it reaches the STOP FILL sensor by manually pressing the STOP
FILLING button.
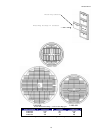
Test Level Sensors
The sensor assembly can be tested through the menu system as well (MENU, 2, 1). The sensor diagnostics
indicates the sensor number and the status (whether in liquid or gas) of that sensor. If the control is set for an
eight-thermistor or Freeze-Guard sensor it will indicate 8 sensors in the diagnostics. Likewise, if it is set for a
four-sensor assembly, it will indicate 4 sensors. The status is indicated with either an “O” for open, a “G” for
gas or an “L”
for liquid. This is an easy means to tell if sensors are in or out of liquid or if a new sensor
assembly is needed (open sensors).