


Page 10
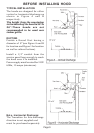
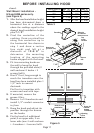
plate
fixing
point
Plate
Figure 3
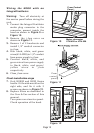
Discharge Direction: The hood is
shipped ready for horizontal
discharge. To change to vertical
discharge move plate to the rear
side and ventilator (if supplied) to
the top side.
The plate and ventilator are held in
place by four nuts each, see also
Figures 3 and ,at page 9, Figure A
and Figure B.
Read also paragraph Integral
Ventilator Installation at pages
14-15 for further informations.
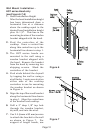
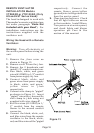
Note: If an integral ventilator is
already supplied (HSB series hoods
only), remove it to allow installation
of hood to the wall/cabinet.
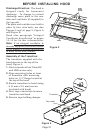
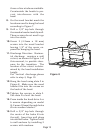
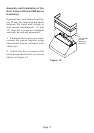
Assembly of the Transition:
The transition supplied with the
hood mounts to the top of the
hood, Figure 4.
1. Fold outwards all six Tabs (HS
and HSB series only).
2. Align mounting holes at base
of transition with mounting
holes on 1/2 flange located at
the top of the hood.
3. Fasten transition to hood using
6 (4 mm x 9.5 mm) screws
(included with hood).
4. Duct tape connection between
transition and hood.
5. Remove tape holding damper
Transition
Top outlet
Tongue
Figure 4
BEFORE INSTALLING HOOD
Tab