


Page 11
closed.
Wall Mount Installation -
HS and HSB series only.
(see Figure 5)
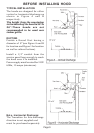
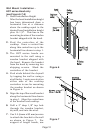
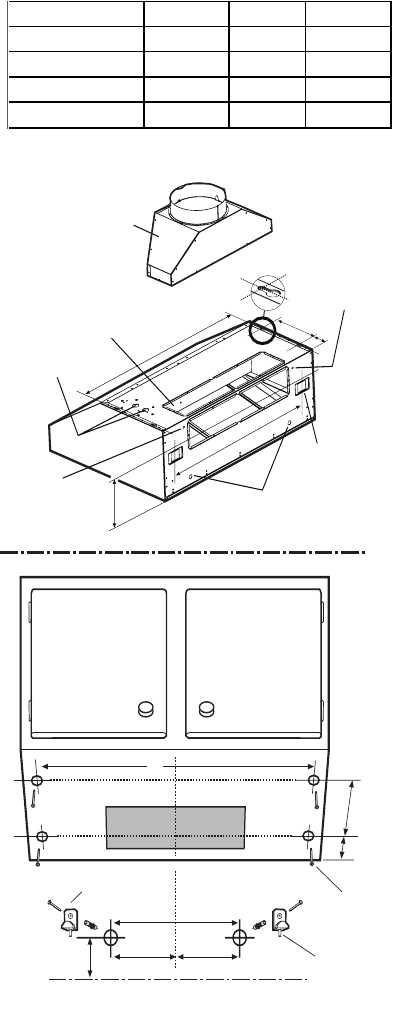
1. After the hood installation height
has been determined draw a
horizontal line at a distance
above the cooktop equal to the
desired hood installation height
plus 7- 1/2”.
2. Find the centerline of the
cooktop. Draw a vertical line
along this centerline up to
the horizontal line drawn in
step 1 and draw a vertica
line right and left at a
distance of 12-5/8” to
determine the mounting
location of the mounting
hooks shipped with the hood.
3. Fit two mounting hooks on
the wall to hang the hood
through the provided slots (2
wall anchors+2 hooks + 2
screws 5x45).
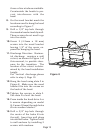
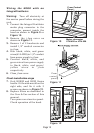
4. Run 8 Duct, long enough to
reach the transition once the
hood has been installed plus 1
1/2 inch to connect
ductwork.
Fix Duct to transition with
screws and seal with tape.
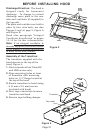
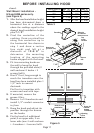
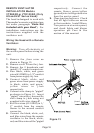
5. If mounted, remove the
grease filter.
6. Remove 1 of 2 knockouts and
install 1/2 conduit connector
in j-box.
7. Hang the hood and adjust its
position through the screws
on the hooks.
8. Fix the hood to 4 additional
point,2 on upper side, 2 on
lower side (use 4 wall anchors
+ 4 washers + 4 screws 5x35.
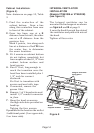
K
CL
bottom mounting
screws locations
Top
screw
location
W
Transition
Top
outlet
Knockouts
(junction box)
Side slot
for cabinet
bottom mount.
Top
screw
location
Z
7 1/2"
Z
W
CL
Screw for
cabinet
bottom
installation
Hook for wall
installation
Adjusting
screw
Square
slot
K
25 3/16"
25 3/16"
7 1/2"
Bottom of the Hood
12 5/8"
12 5/8"
Figure 5
HOOD WIDTH DIM. "W" DIM. "K" DIM. "Z"
30" 29 - 1/8" 2 - 1/2" 7 - 1/16"
36" 35 - 1/16" 2 - 1/2" 7 - 1/16"
42" 41 - 1/16" 2 - 1/2" 7 - 1/16"
48" 47 - 1/16" 2 - 1/2" 7 - 1/16"
Table 3
BEFORE INSTALLING HOOD