


9.8.
Lightwave Oven Use and Care Guide
Operating Instructions (cont.)
6. Remove any dust that may have accumulated during packaging,
simply wipe the Lightwave Oven exterior and interior with a clean,
damp cloth.
7. Do not use abrasive cleaners.
8. Do not put the Lightwave Oven cord or plug in water.
9. When you are ready to use the Lightwave Oven, plug the cord into
a 120V AC outlet. Close the Glass Door. The Operation Light and
the Display Window will illuminate while the unit is plugged in.
10. To eliminate any protective substance or oil that may have been
used for packing and shipping, select the Basic Function by pressing
the Function Button until the arrow is pointing toward the Basic
Function.
11. Set the Timer by turning the Timer/Toast Color Dial until 15 min.
displays under Timer in the Display window.
12. Press the Start/Stop Button and the Lightwave Oven will begin the
Basic Function process. A small amount of smoke and odor may be
detected. This is normal.
13. Condensation may build-up on the inside of the Glass Door, but
will evaporate during the Basic Function.
14. The Lightwave Oven will beep when the Basic Function is complete.
15. Unplug oven and allow to cool completely before cleaning.
16. To avoid scratching, marring, or discoloration, do not store
anything on top of the Lightwave Oven during operation.
See User Maintenance Instructions. Unplug when not in use.
CAUTION: Appliance surfaces are hot during and after use.
CAUTION: Always wear protective, insulated oven mitts on hands when
touching hot Lightwave Oven or hot dishes and food or when inserting
or removing Wire Rack, Broil Insert, Bake/Broil Pan and Crumb Tray.
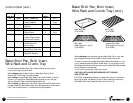
Cooking Containers
◆ The Bake/Broil Pan included with the Lightwave Oven is suitable
for items such as cookies, rolls and biscuits.
◆ A variety of standard baking dishes, such as an 8" round or square
cake pan, a 6-cup muffin pan, and a 1 & 2 quart round, square, or
rectangular casserole dish may be used for other foods.
◆ Choose bakeware made of metal, or glass/ceramic without lids.
◆ Dark or dull pans absorb heat faster; foods will bake more rapidly
and crust will brown more easily than in shiny bake pans.
◆ Check package directions for the cooking container you wish to use,
and/or with the ovenware manufacturer to determine if the container
is suitable for use in a Toaster-Oven-Broiler.
◆ Do not use oven roasting bags in this Lightwave Oven, as they may
come in contact with the heating elements.
CAUTION: Allow at least 1" air space between the top of the
container and the upper heating element. Never use glass lids on
glass or metal bakeware. If a lid is necessary, cover tightly with heavy-
duty aluminum foil.
Operating Instructions
BEFORE FIRST USE
1. Read all instructions in this manual carefully.
2. Carefully unpack your Lightwave Oven and remove all packaging
materials.
3. Place your Lightwave Oven on a level surface such as a
countertop or table. Be sure the sides, back, and top of the
Lightwave Oven are at least four inches away from any walls,
cabinets, or objects on the counter or table.
4. Remove all stickers from the Lightwave Oven except the rating
label located on the bottom.
5. Remove Bake/Broil Pan, Wire Rack, Broil Insert and Crumb Tray
and wash in warm, soapy water. Rinse and dry thoroughly before
placing in the Lightwave Oven.