


3-12
Section 3 - Service and Repair
THERMISTOR OUTAGE
In the event that the condenser thermistor (T4) fails, the unit will
stop all functions and display “ER” on the user interface. The exact
error can be accessed via the service mode.
If the refrigerator thermistor (T1) fails, the refrigerator will stop
operation; however, the ice maker will continue to function. The
display will show “ER.” The exact error can be accessed via the
service mode.
If the ice bin thermistor (T2) fails, the ice maker will stop functioning;
however, the refrigerator will continue to work. The display will
show “ER.” The exact error can be accessed via the service mode.
If the refrigerator evaporator thermistor (T3) fails, the unit will
function normally; however, defrosting will occur on a timing interval
instead of timing and temperature. The display will show “ER.” The
exact error can be accessed via the service mode.
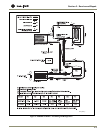
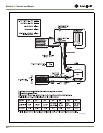
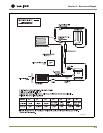
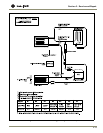
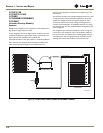
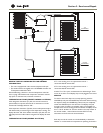
SERVICE
The CLRCO2175 model uses seven relays and four thermistors.
There is a variety of built-in servicing features to aid in diagnosing the
root problem associated with a unit.
To check to see which relays are currently operating, hold the
COLDER key and press the ON/OFF key three times. When entering
the sequence keep the COLDER key pressed until you completely
release the ON/OFF key for the third time. The display will cycle
through a series of numbers to tell which relays are energized. For
example, if the unit was in ice-making mode, the display would show
11 20 31 40 51 60 70. The first number is the relay number. In the
second number, 1 means ON and 0 means OFF. The relay
information can be found in the Control Section.
Each relay can also be turned on and off individually to determine
whether or not the board and component are operating. If a board is
suspected of not operating correctly, you can run through this
sequence to ensure each component is turning on and off through
the board correctly. Go into service mode and choose option #22.
This will cycle every relay on and off showing 10 11 20 21 …. If a
component fails to turn on when the relay does, you can verify if
there is voltage present by using a voltmeter to check the board
output.
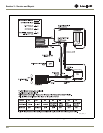
To view the actual refrigerator (T1) temperature, hold the WARMER
key until the actual temperature is displayed. To view the actual
thermistor readings for 2-4, hold the WARMER and COLDER keys
for about five seconds. The display will cycle through the three
thermistors and their temperatures. If a thermistor is unused in a unit
it will show a “0” reading. For thermistor 4 the display will only show
up to “99.” In the event the temperature is higher than this, the
display will show a flashing “99.”
In the general section the methods to enter some other service
modes are available. For the CLRCO2175 model some useful modes
are the ICE MAKER OFF MODE, FORCED REFRIGERATOR
DEFROST, ICE THICKNESS ADJUST, CLEAN, AND TEMPORARY
SHUTDOWN MODE. These can be useful in servicing the unit.
TROUBLESHOOTING:
Error Codes
E1, E2, E7, E8, E9 Bad thermistor errors. Replace thermistor.
Check for thermistor errors by accessing
“View thermistor # status (2, 19, 20, or 21).” If
the error code is repeated, the thermistor is
open or shorted. If a temperature is displayed,
the thermistor is not defective.
E3 This will be accompanied by a beep every
minute. This signals that the door has been left
open for longer than 20 minutes. Close the
door to reset. If the light and display do not go
off when the door is closed, check to make
sure the magnet is positioned properly.
E5 This signals that the unit has been above set-
point for more than twelve hours by at least
10°. If the unit was just plugged in leave for 24
hours to see if the problem is corrected. If it is
not corrected, it is most likely a refrigeration
system issue.
E6 This signals that the refrigerator section has
been at least 10° below set-point for at least
twelve hours. This would most likely be caused
by a bad relay and the circuit board.
P1 Pump circuit is detecting a drain problem.
Consult a plumber to resolve the issue. If unit
does not have a P60 installed, then the jumper
wire is missing in place of the pump.
After checking the errors, be sure to clear the error log by
performing service option 12.
No ice
Check the ice bin temperature. If temperature is in the 34-35°F range
the unit is shut down due to low temperature inside. This could be
caused by low ambient temperatures or running the unit without a
water supply attached.
If the ice bin temperature is above 35°F the unit should be producing
ice. Check to ensure the water trough is full and the pump is
operating. If the components are not operating, see the service
section above.