


3-30
Section 3 - Service and Repair
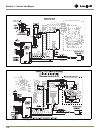
ADJUSTING THE SET-POINT
- 2275DWRWS ONLY
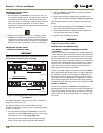
1. Press and release the WARMER icon. The top of the F in °F of
the top drawer will begin to flash. This will allow you to adjust the
temperature of the top drawer. In 10 seconds of inactivity, the
bottom bar of the F in °F will begin to flash (see below); this will
allow you to adjust the temperature of the bottom drawer.
Adjustments to the lower drawer can be made immediately if the
LIGHT icon is pressed.
2. While the top or bottom bar of the F in
°F
is flashing, press the
WARMER or COOLER icon as required to adjust the set-point
temperature. The change will be set five seconds after adjusting the
temperature and the new set-point temperature will be displayed.
Allow the unit to sit for 10 seconds to return to normal mode.
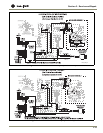
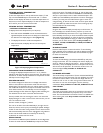
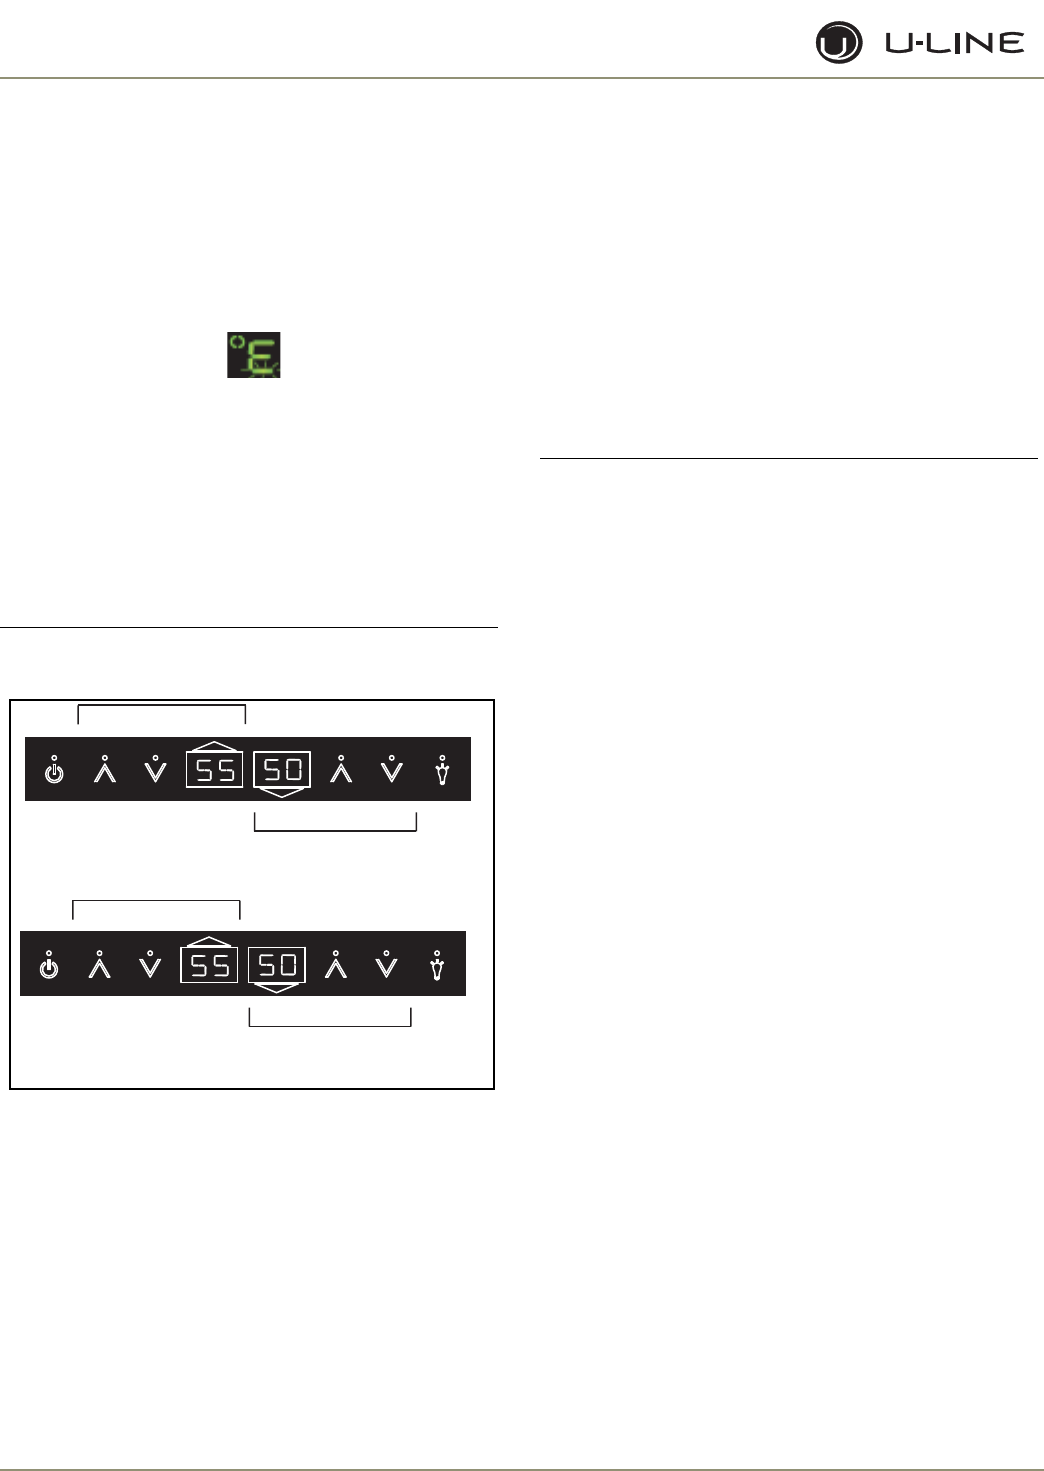
ADJUSTING THE SET-POINT
- 2275ZWC/2275ZWCOL ONLY
IMPORTANT
IMPORTANT
Adjust the set-point temperature and wait 24 hours for the
temperature to stabilize before rechecking.
.
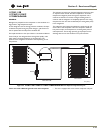
Figure 24. Adjusting Set-Point Temperature-2275ZWC/
2275ZWCOL
This default temperature is used by the controller to maintain the
temperature zones in your unit.
The default temperatures are a recommendation. If further
temperature adjustments are required, use the following procedure
to adjust the set-points.
1. Press and release the desired zone WARMER icon to put the
controller in the SET TEMPERATURE mode. The current range
symbol will show on the display (top, Figure 24).
Note: If no further action is taken, this mode will self cancel in five
seconds, and the original set-point temperature will be displayed.
2. Press the WARMER or COOLER icon to scroll to the desired
range (RW, WW, SW, BV).
3. When the desired range is displayed, press the LIGHT icon to
display the current set-point temperature
(bottom, Figure 24)
.
Note: Set-point temperature can only be changed when the decimal is
flashing.
4. When the decimal is flashing, press the WARMER or COOLER
icon as required to adjust the set-point temperature.
5. When the desired set-point is displayed, press the LIGHT icon.
The new set-point will show in the display.
6. Repeat for other zone display if required.
IMPORTANT
IMPORTANT
Whenever a zone range is changed (example: RW to WW),
it will revert to the factory default.
VIEWING ACTUAL TEMPERATURE
- ALL MODELS EXCEPT 2275DWRWS/2275ZWC/
2275ZWCOL
There are two modes to view temperature. In viewing temperature
in these modes, any offsets are taken into account. This means that if
you place a thermistor in a known temperature, let’s say ice water, it
may not read the 32°F that you would assume. If the control offset
was preset at -3°F while you placed the thermistor in an icebath, the
actual thermistor reading when viewing actual temperature would
read 35°F. In the unit this would cause the cabinet to push itself 3°
cooler. To view pure thermistor readings, you must go into the
service menu and choose the correct option.
To view T1 (normally refrigerator temperature) hold the WARMER
key for approximately five seconds until the “F” flashes. Release and
the display will show the corrected refrigerator temperature. For
Wine Cooler models the display will cycle through all three zones.
These temperatures are approximate and calibrated for a cabinet in
normal ambient temperatures with some product load. Checking a
completely unloaded cabinet may result in other temperatures. Not
available on CLR2160.
To view T2-T4, hold both the WARMER and COLDER keys for
approximately five seconds until the first thermistor reading appears.
At this time the display will cycle through thermistors 2-4 and their
accompanying readings. If a thermistor is not used on that particular
model, it will show “0” and if the thermistor is not working, it will
show an ER.
ULIN_1009_A
☛
ULIN_1012_A
☛
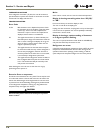
LOWER ZONE CONTROLS
Light
Display
Power
Warmer
Warmer
Cooler
Cooler
Display
UPPER ZONE CONTROLS
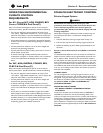
LOWER ZONE CONTROLS
Light
Display
Power
Warmer
Warmer
Cooler
Cooler
Display