


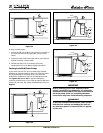

CLR2160, CLRCO2175 19
Light Bulb Replacement
CLRCO2175
To replace the light bulb in your U-Line unit:
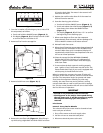
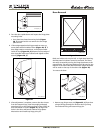
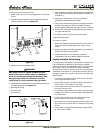
Figure 30
1. Grasp the edges of the light housing lens
(Figure 30, 1) opposite the exposed tab, and gently
push the lens towards the tab (Figure 30, 2).
2. Pull the edge of the lens down
(Figure 30, 1)
, and
swing it out of the light housing.
IMPORTANTIMPORTANT
ALWAYS use a genuine U-Line replacement bulb (P/N
31317) in the light housing. Use of any other bulb
within the housing will generate excessive heat,
causing damage to the light housing and cabinet
interior, and compromising the precise temperature
control of your unit.
3. Replace the bulb only with a genuine U-Line P/N 31317
replacement.
4. Replace the lens by first inserting the tab side back into
the housing at a slight angle. While gently pushing the
lens towards the tab end, push the free end up into the
housing, and release when you will hear a snap/click.
CAUTION
Plumbing installation must observe all state and
local codes. All water and drain connections MUST
BE made by a licensed/qualified plumbing
contractor. Failure to follow recommendations and
instructions may result in damage and/or harm.
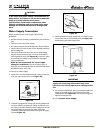
Drain Connection
IMPORTANTIMPORTANT
Drain can NOT be located directly below unit. Unit
has a solid base that will not allow unit to drain
below itself.
The CLRCO2175 can be installed using a Gravity Drain, a
Factory-Installed Drain Pump (U-Line P60) or a Locally-
Installed (U-Line P60) Drain Pump. Drain lines must have a
5/8-inch inside diameter. The floor drain must be large
enough to accommodate drainage from all attached
drains.
Follow these guidelines when installing drain lines to
prevent water from flowing back into the ice maker
storage bin and/or potentially flowing onto the floor,
causing water damage:
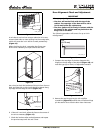
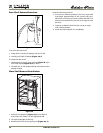
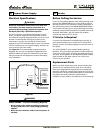
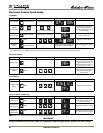
Gravity Drain
A Gravity Drain may be used if:
• Drain line has at least a 1-inch drop per 48 inches of
run (1/4 inch per foot).
• Drain line does not create traps or created traps are
vented (see Figure 31).
Figure 31
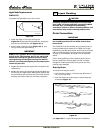
See Figure 32 for a typical Gravity Drain installation.
1
2
ULIN_0001_A
7 Prepare Plumbing
Normal
Proper Drain
With Trap
Poor Drainage, Water Will Back Up
With Trap and Vent
Proper Drain