12
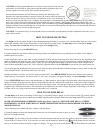
CAUTION: If using hot pads rather than oven mitts for removing hot bread pan from
bread maker, be careful not to allow pads to touch hot heating elements as they can
become singed or even start on fire if not careful. See diagram 12.
Invert bread pan and shake until loaf falls out on cooling rack. Knead bars will
normally stay in pan when bread is removed, but may on occasion, slide out with bread.
If bars are inside loaf, remove before slicing. Cool bread for at least 15 to 30 minutes. If
bread is not removed right after cycle is complete, the bread maker will automatically go into a keep warm mode for up to three (3)
hours. The on light will remain lit during this time and 0:00 will appear in display. When removing bread pan during keep warm
period, always use oven mitts as pan will still be hot. Turn bread maker off by holding start/stop button down until on light goes out.
Unplug cord from electrical outlet after use. If bread maker is not turned off during keep warm period, it will automatically shut itself
off after three (3) hours and the on light will go out.
CAUTION: To avoid burn injury, do not put hands inside oven chamber or touch heating unit after completion of the bake cycle, as
these surfaces are hot.
HOW TO USE DOUGH SETTING
The dough setting will prepare dough for hand shaping/forming and baking in your own oven. Use this setting when you wish to make
dinner rolls, cinnamon rolls, donuts, bread sticks or your own favorite dough recipes. The time delay can be used with the dough
setting. The crust color and loaf size buttons do not apply to the dough setting.
Follow these steps for using the DOUGH setting:
1. Position knead bars onto shafts in bottom of bread pan. Make sure both knead bars are pushed down onto shafts. Twist slightly if
needed to drop bars in place.
2. Add ingredients to pan in order listed in recipe, MAKING SURE to add any liquid ingredients first, followed by dry ingredients, then
butter or margarine and lastly the yeast. After dry ingredients are added to the pan, tap pan several times to settle the ingredients, then
push some of the flour mixture into the corners of pan. This prevents liquid from seeping up from the corners. Make a slight well in
center of flour and add the yeast to well. This is especially important when using the time delay to prevent the yeast from getting wet.
3. Lock bread pan into bread make. Pan must always be locked in place for bread maker to function properly. Always make sure the side
of pan marked FRONT is positioned to the front. Close door.
4. Plug bread maker cord into a 120 volt AC electrical outlet ONLY. Press BREAD SELECT button until indicator arrow points to
dough setting on control panel. The process time of 1:40 (1 hour, 40 minutes) will appear in display. Program time delay if desired.
5. Press START/STOP button once to turn bread maker on. When turned on, the red light will glow and the colon between hours and
minutes will flash. The dough will mix, then be kneaded and allowed to rise before being stirred down. At this time, 0:00 will appear in
the display and an audible alert will sound to let you know the dough is done. Lift front edge of pan up and remove pan from machine.
Complete recipe following instructions. The bread maker will automatically turn itself off upon completion of the dough cycle and the
red light will go out. Unplug cord from electrical outlet after cycle is complete.
HOW TO USE TIME DELAY
The time delay can be used at all settings. Follow steps 1-4 for making bread or dough. Use only recipes with the symbol with the
time delay as these recipes do not contain any perishable ingredients that will spoil when left at room temperature for several hours.
NEVER USE PERISHABLE INGREDIENTS (milk, eggs, cheese, yogurt, etc.) WITH THE TIME DELAY AS THESE
INGREDIENTS CAN SPOIL WHEN HELD AT ROOM TEMPERATURE SEVERAL HOURS BEFORE THE BREAD
MAKER TURNS ON.
After completing above-mentioned steps, continue with steps below:
1. Count the number of hours and minutes between the time you will start the machine to when you want
the bread or dough to be done.
For Example: You are ready to start the machine at 9:30 and want the bread done at 6:00. The number of hours and minutes between
9:30 and 6:00 is 8½ hours or 8:30. 8:30 is the time you enter into the time delay. Hold the (up)
time delay button down to scroll the
time up in 10-minute increments until 8:30 appears in display. If you go past 8:30, use the (down)
time delay button to scroll down


