


Check if...
The air vents are blocked in the refrigerator.
Then...
Remove any objects from in front of the air vents.
Refer to page 13 for the location of air vents.
The door is opened often.
To avoid humidity build-up, try to get everything
you need out of the refrigerator at once, keep food
organized so it is easy to find, and close the door
as soon as the food is removed. (When the door is
opened, humidity from the outside air enters the
refrigerator. The more often the door is opened, the
faster humidity builds up, especially when the room
itself is very humid.)
The room is humid. It is normal for moisture to build up inside the refrig-
erator when the outside air is humid.
The food is not packaged correctly. Check that all food is securely wrapped. If neces-
sary, repackage food according to the guidelines on
page 27, the “Food Storage Guide.” Wipe off damp
food containers before placing in the refrigerator.
The controls are not set correctly for the surround-
ing conditions.
See “How the controls the work” on page 12.
A self defrost cycle was completed.
It is normal for droplets to form on the back wall
after the refrigerator self-defrosts.
THE
DOORS WIU NOT aosE COMPLETELY
Check if...
Then...
Food packages are blocking the door open.
The ice bin is out of position.
Rearrange containers so that they fit more tightly and
take up less space.
Push the ice bin in all the way.
The pans, shelves, bins, or baskets are out
of position.
Put all pans, shelves, bins, and baskets back into
their correct position.
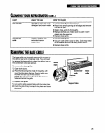
The gaskets are dirty.
Clean gaskets according to the directions on page 24.
I
The refrigerator is not level.
Level the refrigerator. Refer to “Leveling it” on page 8.
The doors were removed during product installa-
tion and not properly replaced.
Remove and replace the doors according to the
removal instructions that came with your refrigerator.
Or, call the Consumer Assistance Center at
1-800-253-l 301.
THE DOORS ARE DIFFICULTTO OPEN
Check if...
The gaskets are dirty or sticky.
Then...
Clean gaskets according to the directions on
page 24.
35