


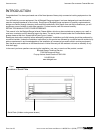


INSTALLATION INFRARED CHEESE MELTER
PAGE 12 OF 28 INSTALLATION AND OPERATION MANUAL 1186533 REV 1 (02/06)
INSTALLATION
NOTICE
These installation procedures must be followed by qualified personnel or warranty will be void.
Local codes regarding installation vary greatly from one area to another. The National Fire Protection Association,
Inc. states in its NFPA 96 latest edition that local codes are the “authority having jurisdiction” when it comes to
installation requirements for equipment. Therefore, installations must comply with all local codes, or in the absence
of local codes, with the National Fuel Gas Code, ANSI Z223.1, Natural Gas Installation Code, CAN/CGA-B149.1,
or the Propane Installation Code CAN/CGA-B149.2, as applicable, including:
1. The appliance and its individual shutoff valve must be disconnected from the gas supply piping system during
any pressure testing of that system at test pressures in excess of 1/2 psi (3.45 kPa).
2. The appliance must be isolated from the gas supply piping system by closing its individual manual shutoff valve
during any pressure testing of the gas supply piping system at test pressures equal to or less than 1/2 psi (3.45
kPa).
STEP 1: UNPACKING
IMMEDIATELY INSPECT FOR SHIPPING DAMAGE
All containers should be examined for damage before and during unloading. The freight carrier has assumed
responsibility for its safe transit and delivery. If damaged equipment is received, either apparent or concealed, a
claim must be made with the delivering carrier.
Apparent damage or loss must be noted on the freight bill at the time of delivery. The freight bill must then be
signed by the carrier representative (Driver). If the bill is not signed, the carrier may refuse the claim. The carrier
can supply the necessary forms.
A request for inspection must be made to the carrier within 15 days if there is concealed damage or loss that is not
apparent until after the equipment is uncrated. The carrier should arrange an inspection. Be certain to hold all
contents plus all packing material.
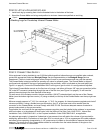
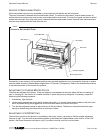
1. Cut the banding straps and remove the corrugated cardboard surrounding the Cheese Melter. Do not remove any
of the attached tags or labels until the Cheese Melter is installed and working properly.
2. Cut the banding strap holding the Cheese Melter to the wooden skid.
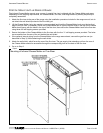
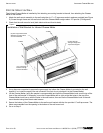
3. If installing Infrared Cheese Melter which mounts over a range, go to Step 2a.
If installing Infrared Cheese Melter which mounts on a wall, go to Step 2b.
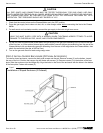
If installing Infrared Cheese Melter which has legs for countertop use, go to Step 2c.