


INSTALLATION INFRARED CHEESE MELTER
PAGE 16 OF 28 INSTALLATION AND OPERATION MANUAL 1186533 REV 1 (02/06)
CAUTION
ALL PIPE JOINTS AND CONNECTIONS MUST BE TESTED THOROUGHLY FOR GAS LEAKS. USE ONLY
SOAPY WATER FOR TESTING ON ALL GASES. NEVER USE AN OPEN FLAME TO CHECK FOR GAS LEAKS.
ALL CONNECTIONS MUST BE CHECKED FOR LEAKS AFTER THE APPLIANCE HAS BEEN PUT INTO
OPERATION. TEST PRESSURE SHOULD NOT EXCEED 14" W.C.
1. Check that the control valves on the Cheese Melter are in the OFF position.
2. Purge the gas supply line to clean out dust, dirt, or other foreign matter before connecting the line to the Cheese
Melter.
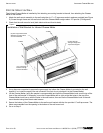
3. For wall-mount and countertop models, connect the gas supply to the inlet at right rear corner.
CAUTION
HOLD THE INLET SUPPLY PIPE WITH A WRENCH WHEN TIGHTENING ADDED FITTINGS TO AVOID
DAMAGE TO THE REGULATOR, VALVE, AND OTHER COMPONENTS.
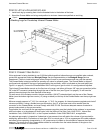
4. For the flue-riser-mounted model, either attach the gas supply to the gas pipe extending out of a hole on the rear
of the flue riser; or (if the optional internal piping was ordered) connect the gas pipe extending from the rear of the
Cheese Melter to the corresponding gas pipe extending from the rear of the range below the Cheese Melter, then
attach the wall-shield (the rear of the flue riser).
5. Turn on the gas and check for leaks using soapy water.
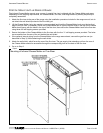
STEP 4: INSTALL SLOPED ENCLOSURE (OPTIONAL ACCESSORY)
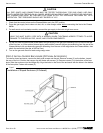
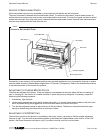
To install a sloped enclosure, remove the body-side screws and discard. Remove screws (3) on the bottom, toward
the rear of the unit. Position the hanger clip and fasten with screws (3). Remove screws (3) in the bottom of the face
plate. Slide the enclosure into the hanger clip. Align the holes in the front of the enclosure with the holes in the bottom
of the face plate. Fasten with screws (3).
Figure 7
Installation of Sloped Enclosure (If Ordered)