


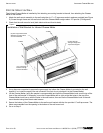

INFRARED CHEESE MELTER INSTALLATION
INSTALLATION AND OPERATION MANUAL 1186533 REV 1 (02/06) PAGE 13 OF 28
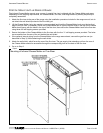
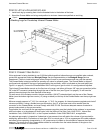
STEP 2A: MOUNT ON FLUE RISER OF RANGE
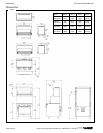
The Infrared Cheese Melter mounts over a range. A special flue riser is shipped with the Cheese Melter and range.
Depending on the shipping requirements, the Cheese Melter, flue-riser, and range base may already be partially or
completely assembled.
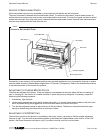
1. Attach the flue riser to the rear of the range using the installation procedure included in the range manual, but do
not attach the wall shield (the back of the flue riser) yet.
2. Lift the Cheese Melter (using two people is recommended) and hook the Cheese Melter-hook over the top-front
edge of the flue riser. If necessary, move the Cheese Melter left or right so that the holes in the top of the Cheese
Melter hook line-up with the holes in the top of the flue riser, then secure the Cheese Melter-hook to the flue riser
using three #10 self tapping screws -provided.
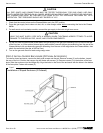
3. Secure the bottom of the Cheese Melter to the flue riser with the four ¼” self-tapping screws provided. The holes
are accessible from the rear of the unit behind the wall shield.
4. If the optional internal piping from the Cheese Melter to the range was ordered, connect the gas line now (as
described in Step 3), before attaching the wall shield.
5. Attach the wall shield, which forms the rear of the flue riser. The gas supply inlet extending out from the rear of
the Cheese Melter should be accessible through the corresponding hole on the back of the flue riser.
6. Go on to Step 3.
Figure 4
Mounting of Infrared Cheese Melter on Flue-Riser