


INSTALLATION INFRARED CHEESE MELTER
PAGE 14 OF 28 INSTALLATION AND OPERATION MANUAL 1186533 REV 1 (02/06)
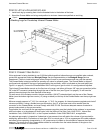
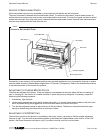
STEP 2B: MOUNT ON WALL
The Infrared Cheese Melter is installed by first attaching a mounting bracket to the wall, then attaching the Cheese
Melter to the bracket.
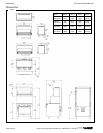
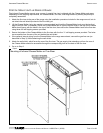
1. Attach the wall-mount assembly to the wall using the six ¼” x 2” lag screws and six washers provided (see Figure
5). Screw through frame and into wall studs since the Cheese Melter weighs about 175 pounds (79 kilograms).
2. Check that the wall-mount is level (both side-to-side and front-to-back).
Figure 5
Installation of Wall Bracket for Infrared Cheese Melter
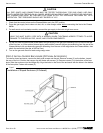
3. It may be more convenient to prepare the gas supply line before the Cheese Melter is mounted on the wall
bracket. If so, install the supply line and connector now (but do not yet attach it to the Cheese Melter).
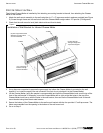
4. Lift the Cheese Melter (using two people is recommended) and hook the Cheese Melter-hook over the top of the
front of the wall bracket. If necessary, move the Cheese Melter left or right so that the holes in the top of the
Cheese Melter hook line-up with the holes in the wall bracket, then secure the Cheese Melter-hook to the wall-
mount bracket using three sheet-metal screws.
5. Secure the bottom of the Cheese Melter to the wall-mount bracket with the four provided ¼” self tap screws. The
holes are accessible from the opening in the bottom of the wall-mount unit.
6. Go on to Step 3.
(6) Stud Lag Screws w/Flat
Washers Through Frame
A
nd Into Wall Stud
To Wall
(4) 1/4” Self Tap
Screws Through
Frame Into Broiler
(3) #10 Self Tap
Through Hanger Into
Top Frame Support
To Wall