


22 23
PAGE HEADER.....
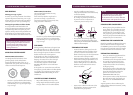
COFFEE MAKING TIPS & PREPARATION
The flavour of your coffee will depend on
many factors, such as the type of coffee
beans, degree of roast, freshness, coarseness
or fineness of the grind, dose of ground coffee
and tamping pressure.
Experiment by adjusting these factors
just one at a time to achieve the taste
of your preference.
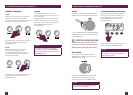
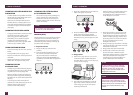
TEXTURING MILK
• Always start with fresh cold milk.
• Fill the jug just below the “V” at the
bottom of the spout.
• Position the steam tip above the drip
tray and lift the steam lever to purge the
steam wand of any condensed water.
• Insert the steam tip 1-2cm below
the surface of the milk close to the
right hand side of the jug at the
3 o’clock position.
• Lift the steam lever.
• Keep the tip just under the surface of the
milk until the milk is spinning clockwise,
producing a vortex (whirlpool effect).
• With the milk spinning, slowly lower the
jug. This will bring the steam tip to the
surface of the milk & start to introduce
air into the milk. You may have to gently
break the surface of the milk with the tip
to get the milk spinning fast enough.
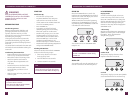
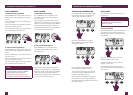
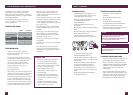
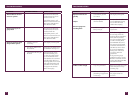
OPTIMUM 25-35 SECBALANCED
GRIND SHOT TIME
TOO FINE OVER 40 SEC
OVER EXTRACTED
BITTER
•
ASTRINGENT
TOO COARSE UNDER 20 SEC
UNDERDEVELOPED
•
SOUR
UNDER EXTRACTED
EXTRACTION GUIDE
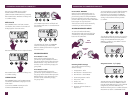
• Keep the tip at or slightly below the
surface, continuing to maintain the
vortex. Texture the milk until sufficient
volume is obtained.
• Lift the handle of the jug to lower the tip
beneath the surface, but keep the vortex
of milk spinning. The milk is at the
correct temperature (60-65°C) when the
jug is hot to touch.
• Move the steam lever to the CLOSED
position BEFORE taking the tip out of
the milk.
• Set the jug to one side, lift the steam
lever to purge out any residual milk
from the steam wand and wipe steam
wand with a damp cloth.
• Tap the jug on the bench to collapse
any bubbles.
• Swirl the jug to “polish” and re-integrate
the texture.
• Pour milk directly into the espresso.
• The key is to work quickly, before the
milk begins to separate and the crema
dissipates.
HINTS & TIPS
• Always use freshly ground coffee
for a superior flavour and body.
• Use freshly roasted coffee beans,
with a roasted-on date and use within
3 weeks of roasted-on date.
• Store coffee beans in a cool,
dark and dry container. Vacuum
seal if possible.
• Buy coffee beans in small batches
to reduce the storage time and store
no more than one week’s supply at
any time.
• Grind beans immediately before
brewing as ground coffee quickly
loses its flavour and aroma.
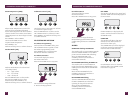
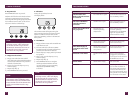
CARE & CLEANING
CLEANING CYCLE
• CLEAN ME! will be displayed on the
LCD to indicate when a cleaning cycle
is required (approx. 200 shots).
• Insert the supplied cleaning disc, followed
by 1 cleaning tablet into the
1 CUP filter basket.
• Insert the portafilter and lock into
group head.
• Ensure the water tank is filled with cold tap
water.
• Ensure the drip tray is empty & inserted.
• Press MENU button until
CLEAN CYCLE icon flashes and
PUSH is displayed on the LCD screen.
• To start the Clean Cycle press the
illuminated MANUAL button.
• The CLEAN CYCLE icon will flash and
the machine will start to countdown from
370 seconds.
• When the cleaning cycle has finished,
remove the portafilter and ensure
the tablet has completely dissolved.
If the tablet has not dissolved, repeat
the steps above, without inserting a new
tablet.
• Rinse the filter basket and portafilter
thoroughly before use.
INSTALLING WATER FILTERS
• Soak filter in a glass of water for
5 minutes.
• Rinse the filter and mesh under
running water.
• Assemble filter into filter holder.
• Set replacement date forward 2 months.
• Install filter holder into water tank.
• Insert water tank into the machine. Ensure
the latch is locked into position.
NOTE
To purchase filters contact Breville
Customer Service Centre on
AUS 1300 139 798 NZ 0800 273 845
or visit www.breville.com.au
NOTE
Change filters every 2 months.
Contact Breville Customer Service
Centre for advice.
CLEANING THE STEAM WAND
• Wipe the steam wand with a damp cloth &
purge directly after texturing the milk.
• If any of the holes in the tip of the steam
wand become blocked, ensure the STEAM
LEVER is in the CLOSED position and
clean using the pin on the end of the
cleaning tool.
• If steam wand remains blocked, remove
the tip using the integrated spanner in the
cleaning tool and soak in hot water. Screw
tip back onto the steam wand using the
integrated spanner in the cleaning tool.