


12
13
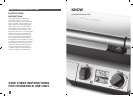
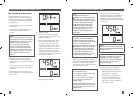
Once the grill has preheated to the 8.
selected temperature, the grill alert will
sound and 'HEATING' will no longer
illuminate. The LCD screen will display
the selected temperature and the default
‘0’ zero time.
NOTE:
Always allow the grill to completely
preheat to the selected temperature
before cooking.
NOTE:
The LCD illumination may display
'HEATING' during the cooking
process. This is normal, indicating
that the correct temperature is
being maintained.
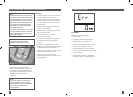
To open the grill into ‘BBQ Mode’:9.
a) Ensure the grill has completely
preheated and the LCD screen no
longer displays 'HEATING'.
b) Ensure the top cooking plate is
closed. The Adjustable Height
Control clip, located on the right
side of the top plate, should be in
the ‘OPEN’ position.
NOTE:
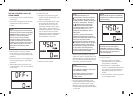
The Smart Grill features a
Temperature Conversion Button
on the left side of the LCD screen.
The temperature reading on the grill
is preset to Fahrenheit. Pressing
the Temperature Conversion
Button converts the Fahrenheit
temperature reading into Celsius.
The corresponding ‘°F’ or ‘°C’
symbol will be displayed on the
LCD screen.
NOTE:
If you have changed the default
Fahrenheit temperature reading to
Celsius, the setting will remain in the
memory of the grill until the
Temperature Conversion Button
is pressed a second time or the grill
is unplugged from the wall outlet.
When the grill is plugged back into
the wall outlet, the temperature
reading will automatically return to
the preset Fahrenheit setting.
While the grill is preheating, adjust the 7.
angle of the cooking plates to the desired
position by turning the Plate Tilt Dial.
The Plate Tilt Dial is located on the lower
back, right side of the grill.
NOTE:
We recommend using:
- The ‘ANGLE’ position to drain fats
for healthier cooking.
- The ‘FLAT’ position for cooking
eggs, pancakes, paninis and
leaner meats.
The unique indent between the two
cooking plates channels juices from
both plates into the same drip tray
while cooking.
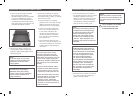
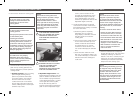
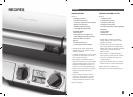
USE IN OPEN FLAT ‘BBQ MODE’
The grill opens flat into a 260 sq. inch
grilling surface. The ribbed cooking plate
is perfect for searing meats while the flat
cooking plate is ideal for eggs, pancakes
and vegetables.
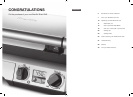
Ensure the drip tray is correctly inserted 1.
into the grill.
Ensure the cooking plates are correctly 2.
inserted and securely locked into
position.
NOTE:
If the cooking plates are incorrectly
inserted, the LCD screen will display
‘INSERT PLATE’. Use the 2 x ‘Plate
Release’ to remove the plates
then re-insert so they securely
lock into position. Always ensure
the grill is completely cool before
releasing and removing the cooking
plates. Refer to page 11 for more
information on using the ‘Plate
Release’.
Place the grill on a flat, dry surface. 3.
Ensure there is a minimum distance of
4" (10cm) of space on both sides of the
appliance.
Unwind the power cord completely and 4.
insert the power plug into a grounded
wall outlet.
The grill alert will sound and the LCD 5.
screen will display ‘OFF’ and the default
‘0’ zero time.
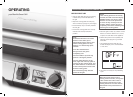
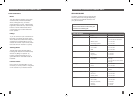
To preheat the grill:6.
a) Ensure the top plate of the grill is
closed. This will ensure faster, more
efficient preheating.
b) Turn the Temperature Dial to adjust
the temperature. Rotate the dial
to ‘SEAR’ (450°F-410°F) for fast
preheating, ‘PANINI’ (400°F-360°F),
‘LOW’ (350°F-320°F) or select an
alternative temperature. The grill will
start to heat and the LCD screen
will illuminate orange and display the
selected temperature, ‘HEATING’ and
the default ‘0’ zero time.
c) Allow the grill to preheat.
OPERATING YOUR BREVILLE SMART GRILL OPERATING YOUR BREVILLE SMART GRILL