


12
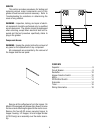
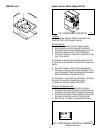
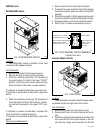
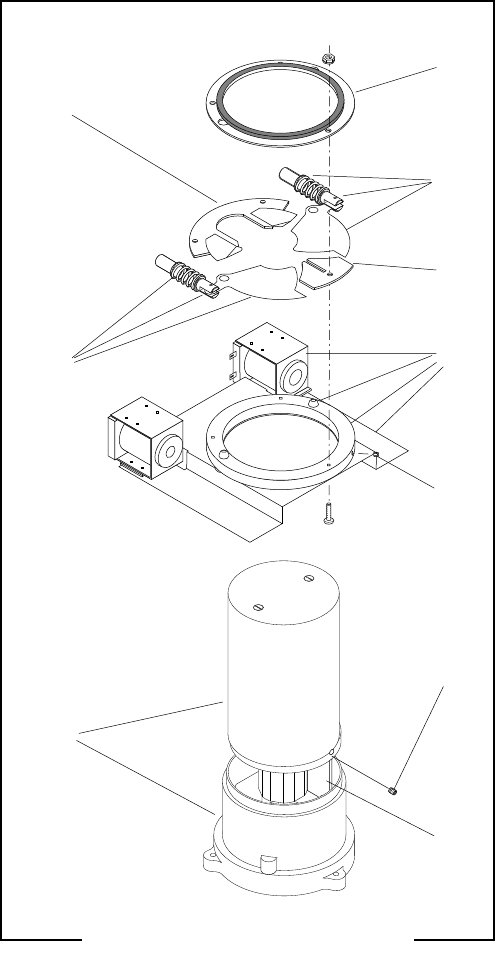
1. Retaining Ring W/Hopper Gasket
2. Filler Plate
3. Slide Plate, Solenoid Plunger and Spring
4. Spacer Plate
5. Setscrew, #10 -32
6 Mounting Ring, Solenoid and Solenoid Mounting
Plate
7. Setscrew, #8-32
8. Burr Housing Divider
9. Motor and Burr Housing
P1050
1
3
4
6
5
7
8
2
3
9
FIG. 13 SOLENOID AND GATES
SERVICE (cont.)
Motor (cont.)
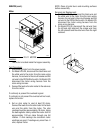
9. Slide spacer plate (4) off of burr housing divider
(8) and set aside for reassembly.
10. Loosen the #10-32 setscrew (5) securing the
mounting ring and solenoid bracket (6) to the burr
housing.
11. Lift mounting ring, solenoid bracket and solenoids
(6) over the motor and burr housing assembly (9)
and set aside for reassembly.
12. Remove the #8-32 setscrew (7) and set aside for
reassembly.
13. Lay motor on it’s side.
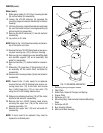
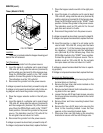
NOTE: Refer to Fig. 14 for the disassembly and assem-
bly of the burrs and rotor.
14. Remove the two #10-32 fillister head screw secur-
ing burr housing cap (10) to the burr housing.
15. Remove cap, burr adjusting screw, decaffing plate
and decaffer support (10) as an assembly. Set
aside for reassembly.
16. Remove load disc (11) and set aside for reassem-
bly.
17. Slide rotor (12), lower burr (13) and spring (14) as
an assembly off the motor shaft, set aside for
reassembly.
18. Remove burr housing divider (8) and set aside for
reassembly.
NOTE: Inspect rotor. If rotor needs to be replaced,
remove the two #10-32 binding head screws se-
curing lower burr (13) to the rotor and remove
burr. Install lower burr (13) on new rotor (12)
using two #10-32 binding head screws.
19. Slide spring retaining bushing (15) off the motor
shaft and set aside for reassembly.
20. Remove the two #10-32 binding head screws
securing the upper burr (16) to the motor and
housing assembly (17).
21. Remove the upper burr (16) and set aside for
reassembly.
NOTE: If burrs need to be replaced, they must be
replaced in matched pairs.
27091 111598