9
WATER INLET SET-UP
The My Café
™
Automatic Pod Brewer is designed for businesses and office
applications, where a pressurized water system can be utilized to feed the brewer with
a constant water supply. If the machine will not be used with plumbing, proceed to the
“Pour-Over” Section on page 12.
IMPORTANT NOTE
: If the brewer is to be used as a pour-over, the cap must be installed
on the water inlet fitting, located in the rear of the brewer. (See FIG. 3) Otherwise,
prepare the existing water line as defined in “Plumbing Requirements” and then follow
the instructions provided below.
PLUMBING REQUIREMENTS
If used as an automatic, this brewer must be connected to a cold water system with
operating pressure between 20 and 90 psi (138 and 620 kPa). A shut-off valve should
be installed in the line before the brewer. Install a regulator in the line when pressure
is greater than 90 psi (620 kPa) to reduce it to 50 psi (345 kPa). The water inlet fitting
on the strainer is 3/4-14 BSPP. Water line must be able to supply a minimum of 833
mL/min (.222 gpm)..
This equipment must be installed to comply with the Basic Plumbing Code of
the Building Officials and Code Administrators International, Inc. (BOCA) and
the Food Service Sanitation Manual of the Food and Drug Administration (FDA).
For models installed outside the U.S.A., you must comply with the applicable
Plumbing Codes for your area.
PLUMBING HOOK-UP
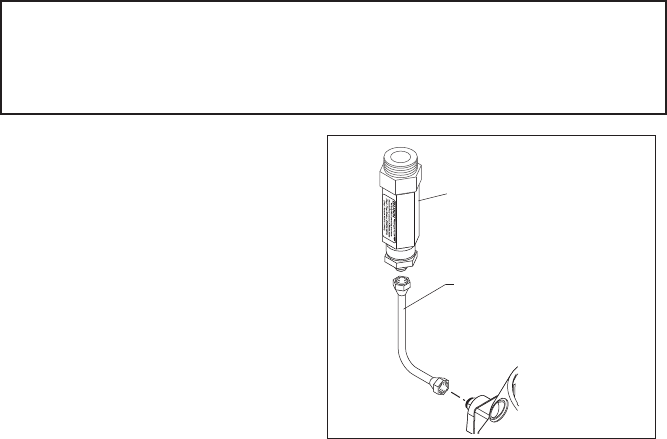
1. Attach the 90° tube to the flare inlet
fitting on the back of the brewer.
2. Install the strainer/flow control to the
inlet tube.
NOTE: Ensure the flow arrow depicted
on the label of the strainer/flow control
is facing toward the brewer.
3. Flush the water line and securely
attach it to the fitting on the inlet of the
strainer/flow control.
CAUTION: The Strainer/Flow Control
must be installed to prevent damage to
the brewers internal water lines.
Strainer/flow control
Provided tube
FIG 3. Plumbing
P3525


