


and use as described in the ground coffee funnel (chapter 11).
Please note: If you like flavored coffees we recommend to add
flavors to your coffee after brewing. This way you can use your
regular coffee beans in the bean container. Adding the flavors
after brewing lets you control the intensity much better than with
pre-flavored coffee. Your local coffee store typically carries a
variety of flavors.
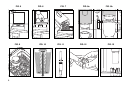
• Open the Cover Lid (Fig. 5).
• Remove the Aroma Protection Lid (Fig. 6).
• Make sure the bean container is empty and clean. Fill beans
into the bean container (Fig. 7).
Frozen Beans: Thaw 3 to 4 hours before adding to bean
container. This prevents moisture from seeping into the grinder.
Oily Beans: Beans with an oily surface tend to stick together.
This may prevent a continuous flow of beans from the bean
container into the burrs. As a result the grinder does not grind
enough coffee and you might get weak or no coffee at all.
Stir the beans in the bean container just before grinding.
Alternatively, you can also pour the beans in an open bowl and
let them sit for about 5 hours. The oils will evaporate (this will
not change the taste of your coffee). Then fill the beans into the
bean grinder. Now beans will feed into the burrs more easily.
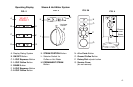
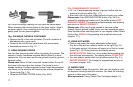
6c. TURNING THE MACHINE ON
• Press the Main Power Switch in the back of the machine (Fig. 1b)
The On/Off button in the front will illuminate (Fig. 2,B)
• Push the On/Off button. The display shows FILL SYSTEM /
PRESS STEAM.
• Place a container underneath the steam nozzle (Fig. 4) and
press one of the steam buttons (Fig. 3,M).
SYSTEM FILLING.
The machine will dispense a little bit of water through the
steam nozzle.
HEATING UP / PRESS RINSE.
• Place cup underneath the dual coffee spout (Fig. 8) and press
the RINSE button (Fig. 2,E). MACHINE RINSING. The
machine will dispense a little bit of hot water through the coffee
spout.
SELECT PRODUCT.
Please note: You can only make coffee when the display reads
SELECT PRODUCT and the machine is not in programming mode.
• Place a cup under the coffee spout and push one of the coffee
buttons. The machine will grind and brew coffee. If the display
shows
FILL BEANS push one of the coffee buttons again.
• Discard the first two cups of coffee.
You are now ready to brew coffee.
CUP ILLUMINATION
The cup illumination adds a dramatic touch to brewing coffee.
Providing the machine is plugged in, you can activate the cup
illumination for 3 minutes by pressing any button.
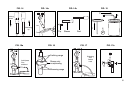
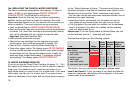
7. ADJUSTING THE GRINDER
You can adjust the grinder to the roast of your coffee.
We recommend the following:
• Light roast: use a finer adjustment.
• Dark roast: use a coarser adjustment.
• Open the cover of the bean container (Fig. 5).
• To adjust grinding turn the selector switch to the desired
position (Fig.9).
You have the following possibilities:
• The smaller the dots, the finer the grinding.
12.