


9
PRELIMINARY CHECKS
Checking the appliance
After removing the packaging, make sure the product is
complete and undamaged and that all accessories are present.
Do not use the appliance if it is visibly damaged. Contact
De’Longhi Customer Services.
Installing the appliance
Important!
When you install the appliance, you should respect the
following safety warnings:
• The appliance gives o heat. After positioning the
appliance on the worktop, leave a space of at least 3 cm
between the surfaces of the appliance and the side and
rear walls and at least 15 cm above the coee maker.
• Waterpenetratingtheappliancecouldcausedamage.Do
not place the appliance near taps or sinks.
• Theappliancecouldbedamagedifthewateritcontains
freezes. Do not install the appliance in a room where the
temperature could drop below freezing point.
• Arrangethepowercableinsuchawaythatitcannotbe
damaged by sharp edges or contact with hot surfaces
(e.g. electric hot plates).
Connecting the appliance
Important!
Check that the mains power supply voltage corresponds to
the value indicated on the rating plate on the bottom of the
appliance.
Connecttheappliancetoanecientlyearthedandcorrectly
installed socket with a minimum current rating of 10A only.
If the power socket does not match the plug on the appliance,
have the socket replaced with a suitable type by a qualied
professional.
Using the appliance for the rst time
Please note :
• Coeehasbeenusedtofactorytesttheapplianceanditis
therefore completely normal for there to be traces of coee
in the grinder. The machine is, however, guaranteed to be
new.
• Youshouldcustomisewaterhardnessassoonaspossible
following the instructions in the section “Setting water
hardness” on page 16.
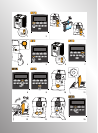
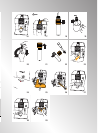
1. Plug the appliance into the mains socket and place the
main switch on the back of the appliance in the I position
(g. 1).
You must rst choose the language (the languages scroll
through at intervals of about 3 seconds).
2. When “English” appears, press the OK button (g. 2) for a
few seconds until “ENGLISH set” is displayed.
Follow the instructions indicated by the appliance:
3. “FILLTANK”:removethewatertank,lltotheMAXline
with fresh water then replace in the appliance (g. 3).
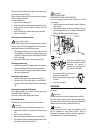
4. Turn the cappuccino maker outwards and place a container
with a minimum capacity of 100 ml underneath (g. 4).
5. “TURNSTEAMKNOB”isdisplayed.Whenthesteamknob
isturnedtotheIposition(g.4),“HotwaterPressOK”is
displayed.
6. Press the OK button (g. 2).
“Please wait” is displayed and the appliance begins to
deliver water from the hot water spout.
The appliance ends the rst start up procedure, then the
message “Turning o, Please wait” is displayed and the
appliance goes o.
The coee maker is now ready for normal use.
Please note:
• Whenusingtheapplianceforthersttime,youneedto
make 4-5 cups of coee or 4-5 cappuccinos before the
appliance starts to give satisfactory re-sults.
TURNING THE APPLIANCE ON
Please note:
Before turning the appliance on, make sure the main switch on
the back of the appliance is in the I position (g. 1).
Each time the appliance is turned on, it performs an automatic
preheat and rinse cycle which cannot be interrupted.
The appliance is ready for use only after completion of this
cycle.
Danger of burns!
During rinsing, a little hot water comes out of the coee spouts
and is collected in the drip tray underneath.
Avoid contact with splashes of water.
• Toturntheapplianceon,pressthe button (g. 5).
The message “Heating up, Please wait” is displayed.
After heating, the message “Rinsing” is displayed. As well as
heating the boiler, the appliance also heats the internal circuits
by circulating hot water.
The appliance is at temperature when the message indicating
the taste and quantity of coee appears.
TURNING THE APPLIANCE OFF
Each time the appliance is turned o, it performs an automatic
rinse cycle which cannot be interrupted.