


F200F200
F200F200
F200
F300F300
F300F300
F300
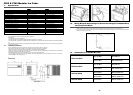
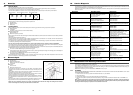
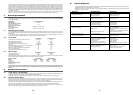
Output (kg/ 24 hours) 215 320
Bin Storage Capacity (kgs) 150/ 210 150/210
Cubes Per Cycle (kgs) 2.3 2.3
Standard Cube Size 24mm x 24mm x 26mm 24mm x 24mm x 26mm
Cycle Time (minutes) 16 11
Amps start/run 29/5.5 31/8.5
Watts Consumption 1000 1600
Machine Weight net / gross (kgs) 70/85 73/88
Refrigerant R404A R404A
Refrigerant Charge 500 grms 850 grms
Discharge Pressure Freeze Cycle Max 17 bar/ Min 15 bar Max 18 bar/ Min 16 bar
High Pressure Cut Out 30 bar 30bar
High Pressure Safety Switch Cut in 20 bar/ Cut Out 33 bar Cut in 20 bar/ Cut Out 33 bar
Suction Pressure Freeze Cycle Start 3.6 bar/ End 2.3 bar Start 3.6 bar/ 2.5 bar
Compressor Amps Freeze Mode Start 4.2 amps/ End 3.4 amps Start 7.0 amps/ End 5.2 amps
Voltage 230/50/1 230/50/1
Reservoir Water Level 40mm to 45mm 40mm to 45mm
Water inlet Connection
3
/
4
gas
3
/
4
gas
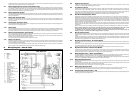
1. Specification
1.1 Capacities
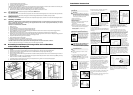
1.2 Installation Notes.
Allow 15cm minimum space at the sides and back for ventilation.
Bin Installation
The F200 and 300 fit the New SB150 Bin.
The F200 and F300 can be fitted to the New SB210 Bin but a KN311 Lid is required.
The F200 and F300 can be fitted to the Old SB150 Bin but a SB150 frame is required, as the F200 and F300 are smaller than the Old SB150
Bin.
The F200 and the F300 can be fitted to the Old SB210 Bin provided the KN310 lid is fitted first. However it is necessary to re-drill the lid to
secure the machine to it.
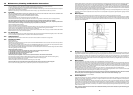
1.3 Stacking Installation.
To stack a Modular Cuber onto the present one, first remove the top panel from the lower machine.
Add a bead of food grade silicone sealer to the top edges of the lower units freezing compartment.
Lift the top machine onto the bottom machine, (the use of a mechanical lift is recommended).
Align the two machines, and using the two screws supplied in the hardware package supplied with the top machine, fasten the two together
through the fixing holes on either side of the machines.
Fit the Stacking Kit KS into the bottom machine as per the instructions supplied with the kit.
Using food grade silicone sealer, seal the edges between the freezing compartments of the top and bottom machine so as to avoid any
possible leakage of water through the join.
4
F200 & F300 Modular Ice Cuber
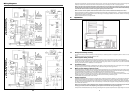
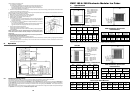
1. Detach the light blue (No.13) cable of the upper ice maker; this cable is connected to the NC contact (usually closed) of the micro.
Connect it to the light blue (No.14) cable which is joined to the NO contact (usually opened) of the conveyor kit micro.
2. Connect the brown (No.16) cable which comes from the COM (common) contact of the conveyor kit micro to the NC contact (usually
closed) of the upper ice maker micro.
Fig.4
Fig.5 Fig.6
25
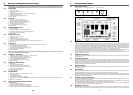
14. Guidelines for Icemaker Bin Lids
FMIC 180 HEAD
FMIC 260 HEAD
FMIF 220 HEAD
FMIF 550 HEAD
SB 150 BIN
SB 210 BIN
SB 150 BIN
SB 210 BIN
SB 150 BIN
SB 210 BIN
SB 210 BIN
NO BIN LID
KN 310 BIN LID
NO BIN LID
KN 310 BIN LID
NKF 200 BIN LID
NKF 310 BIN LID
NKF 310 BIN LID
13. Wiring Diagram Concerning The Connection Of Upper Ice Maker Micro
To Conveyor Kit Micro