2-3
DANGER
All wiring connections for this appliance must be made in accordance with the
wiring diagram(s) furnished with the appliance. Refer to the wiring diagram(s)
affixed to the inside of the appliance door when installing or servicing this
equipment.
2.3 Installation
1. This equipment must be securely bolted to the deck.
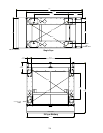
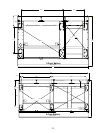
2. Install deck studs for the specific fryer configuration in accordance with the diagrams at the end
of this chapter.
3. Position the fryer on the deck studs and secure with appropriate nuts and lock washers.
DANGER
No structural material on the fryer should be altered or removed to accommodate
placement of the fryer under a hood. Questions? Call the Frymaster Dean Service
Hotline at 1-800-551-8633.
2.4 After Fryers Are Anchored At the Frying Station
DANGER
Hot oil can cause severe burns. Avoid contact. Under all circumstances, oil must be
removed from the fryer before attempting to move it to avoid oil spills, falls and
severe burns. This fryer may tip and cause personal injury if not secured in a
stationary position.
1. Close frypot drain-valve(s) and fill frypot(s) with water to the bottom oil level line.
2. Boil out frypot(s) in accordance with the instructions in Section 5.1.3 of this manual.
3. Drain, clean, and fill frypot(s) with cooking oil. (See Equipment Setup and Shutdown
Procedures in Chapter 3.)
2.5 Dimensions and Weights
Single Fryer: LWH (inches) 33.38 X 15.67 X 45.5 – 190 lbs. empty.
2-Fryer Battery: LWH (inches) 33.39 X 31.45 X 45.5 – 490 lbs. empty.
3-Fryer Battery: LWH (inches) 33.24 X 47.10 X 45.5 – 570 lbs. empty.
4-Fryer Battery: LWH (inches) 33.45 X 62.55 X 45.5 – 780 lbs. empty.


