


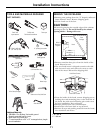
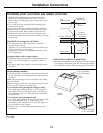
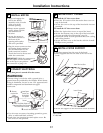


INSTALL MOTOR
Installation Instructions
17
7
Motor Attachment Bracket
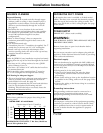
1 Ft = 0.3 m
1” = 2.5 cm
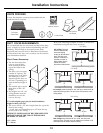
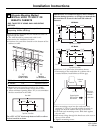
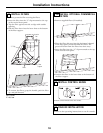
INSTALL DUCT COVERS
9
To install the 12” duct cover alone:
• Place the 12” section of the decorative duct cover on
top of the hood.
• Secure the cover to the top of the hood with 4 screws
provided.
To install the 12” duct cover alone:
• Place the 2-piece duct cover on top of the hood.
• Secure the bottom cover to the top of the hood with
4 screws provided. See illustration, page 16.
• Extend the inside section upwards to meet the ceiling
and ceiling bracket.
• Secure the duct cover to the bracket with the 2 small
Phillips screws provided.
IMPORTANT: Hold the connector so
the two square corner terminals
are at the top as you position
the connector to plug it in.
Motor Hooks
• Align and engage the
slots in the blower
assembly to the 3 hooks
at the rear of the
exhaust opening.
• Rotate motor upwards
until it aligns with the
attachment screw
location.
• Secure the motor to
attachment bracket at
the front of the
opening with washer
and screw provided.
• Plug the motor connector into
the mating hood connector.
See the illustration for the
hood connector location.
Touch the hood to locate and
make the connection.
A
B
C
D
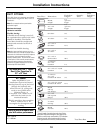
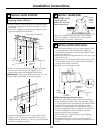
CONNECT ELECTRICAL
8
• Use wire nuts to connect incoming ground to green,
white to white and black to black.
• Push wires into junction box and replace cover. Be
sure wires are not pinched.
Remove
Junction Box
Cover
Ground
Insert Power
Coduit Thru
Strain Relief
and Tighten
White
Check That White, Black and
Green Hood Wires Are Threaded
Thru Small Hole in Bracket
Black
WARNING:
If house wiring is not 2-wire with a ground wire, a
ground must be provided by the installer. When house
wiring is aluminum, be sure to use cUL. approved anti-
oxidant compound and aluminum-to-copper
connectors.
Verify that power is turned off at the source.
Use cUL Listed Wire Nuts
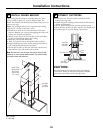
INSTALL FILTER SUPPORT
10
• Tip filter support into the rear of the hood.
• Insert support tabs into the slots at the rear of the
hood.
• Secure the support to the hood with screws as shown.
Insert Tabs into Slots
Insert 2 Screws