


Before you begin—Read these instructions completely and carefully.
IMPORTANT: Save these instructions for local inspector’s use.
IMPORTANT: OBSERVE ALL GOVERNING CODES AND ORDINANCES.
NOTE TO INSTALLER: Be sure to leave these instructions with the Consumer.
NOTE TO CONSUMER: Keep these instructions with your Use and Care Book for future
reference.
This appliance must be properly grounded. See “Power Supply”, page 5.
Cet appareil doit être mis à la terre correctement. Voir la section « Alimentation
électrique » en page 5.
If you have a question concerning the
installation of this product, call the GE Answer
Center
®
Consumer Information Service at
800.626.2000, 24 hours a day, 7 days a week.
If you received a damaged compactor, you
should immediately contact your dealer or
builder.
2
Design Information
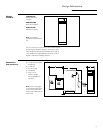
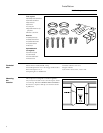
Models Available ......................................................................................................................................................................3
Dimensions and Clearances ....................................................................................................................................................3
Installation Preparation
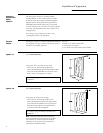
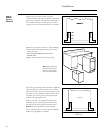
Standard Appearance Panel Option ......................................................................................................................................4
Custom Panels ..........................................................................................................................................................................4
Option 1: 1/4" Thick Wood Panel ..........................................................................................................................................4
Option 2: 3/4" Thick Wood Panel ..........................................................................................................................................4
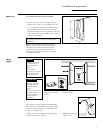
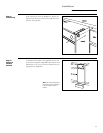
Option 3: 3/4" Thick Wood panel with Custom Handle........................................................................................................5
Power Supply ............................................................................................................................................................................5
Installation
Technical Data ..........................................................................................................................................................................6
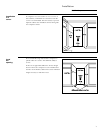
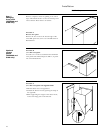
Choosing the Location ............................................................................................................................................................6
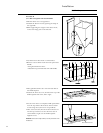
Installation in a Corner ............................................................................................................................................................7
Level the Opening ....................................................................................................................................................................7
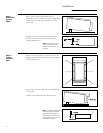
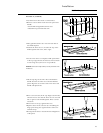
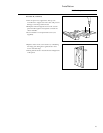
Step 1 Determine Toekick Depth ............................................................................................................................................8
Step 2 Adjust Movable Base ....................................................................................................................................................8
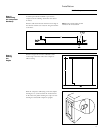
Step 3 Positioning the Compactor Backstop ..........................................................................................................................9
Step 4 Setting the Height ........................................................................................................................................................9
Step 5 Attach Tip-Over Brackets ............................................................................................................................................10
Step 6 Optional Custom Toekick ..........................................................................................................................................11
Step 7 Changing Front Panel ................................................................................................................................................12
Optional Custom Panels ........................................................................................................................................................13
NOTICE
• Compactor is shipped with ram in “Down” position.
Trash container compartment cannot be opened until
the ram is restored to normal “UP” position. See label
on compactor.
• Compactor has adjustable base to set toekick depth
to match cabinets. This adjustment must be made
prior to installing unit under countertop. See page 8.
• Compactor is designed for BUILT-IN applications
ONLY.
• Consideration must be given to provide adequate
clearances for installation and servicing.
• Do not use an extension cord or adaptor plug with
this appliance.
Proper installation is the responsibility of the installer.
Product failure due to improper installation is not covered
under the GE Appliance Warranty. See the Owner’s
Manual for warranty information.
For Monogram local service in your area, 800.444.1845
For Monogram Parts and Accessories, call 800.626.2002.
Contents
CAUTION
CAUTION
WARNING
AVIS
• À l’expédition, le bras de compression du compacteur se
trouve à la position « Down ». Il est impossible d’ouvrir le
compartiment du récipient à déchets tant que le bras de
compression ne revient pas à la position normale « UP ».
Lire l’étiquette sur le compacteur.
• Le compacteur est doté d’une base réglable permettant
d’adapter la profondeur du coup-de-pied à l’armoire. Ce
réglage doit être effectué avant de monter l’appareil sous le
comptoir. Voir la page 8.
• Le compacteur est conçu pour être ENCASTRÉ
SEULEMENT.
• Les dégagements appropriés doivent être prévus pour le
montage et l’entretien.
• N’utilisez pas de rallonge ou de fiche d’adaptation avec cet
appareil.
AVERTISSEMENT
MISE EN GARDE